 Search
Color and Draw - Photoshop
Page 1 of 1

Color and Draw - Photoshop
![]() by 3loomi Wed Dec 29, 2010 3:31 am
by 3loomi Wed Dec 29, 2010 3:31 am
Coloring Tutorial in Photoshop
I did my best to write this tutorial in a not-so-bad English but please keep in mind that it's not my native language.
This
is personnal way of coloring. I don't pretend to be a Photoshop grand
master, and I don't say that this is the best way of coloring using
Photoshop but it's MY way. You can always adapt what you read here if
it suits you better. In this tutorial, I assume that you already have
some basic knowledge of Photoshop (Including layers, tools and color
modes)
Now, before you start coloring, I suggest that you read through the entire tutorial first.
<table width="99%" border="0" cellpadding="0" cellspacing="0"><tr><td>  </tr> </table> | 1) First, open your line art and give a significant name to the layer. I use "Line Art". Then, set this layer to "Multiply". I suggest you work on a high resolution if your computer can support it. For this particular picture, I worked at 300 DPI. The picture size was 10,13 x 18 in (3039 x 5400 pixels). The higher is the better! Your line Art might be in grayscale. If so, you should set it in RGB or CMYK. I won't explain the difference between these two as it's quite complex but if your picture is only for the computer screen, use RGB. |
| <table width="99%" border="0" cellpadding="0" cellspacing="0"> <tr> <td>  </tr> </table> | 2) Now, this is where we start to color! Create a new layer and place it under your line Art. Give it a significant name ( mine are named in French ) and start coloring an element. Don't start shading yet! Repeat it for all the elements of your pictures. If your computer don't support a lot of layers, you can put serveral colors on your layer but try to choose isolated colors. It will make things easier when you'll start the shading. If you get too many layers, you can organise them with folders. Now you have a good idea of what your picture will look like. You can change the color of the elements if you feel it's not right anymore. I changed the color of the sky and grass a few times during the coloring of this picture so don't be surprised! This is why I don't start the shading before I see the entire color palette. Speaking of palette, don't be afraid to use it to store your colors! |
| <table width="99%" border="0" cellpadding="0" cellspacing="0"> <tr> <td>  </tr> </table> | 3) One last thing to do before you start shading: determine where the light comes from. Mine is from the front , on the left. Let's the fun begin! Using the magic wand ( or clicking on the layer while holding ctrl or command on Macs), select the color you want to shade. I'll begin with the skin. |
| <table width="99%" border="0" cellpadding="0" cellspacing="0"> <tr> <td>  </tr> </table> | 4) Choose a soft brush and set it to 50%. Then choose a darker color. I can't help you to choose this color. Only practice and experience will make you better. You can also use the Dodge and Burn tools but it shouldn't be the only thing used.I try to avoid it as much as possible. Add a little bit of color over the dark area. Then repeat it until you have all the shades you want. It's like using watercolor: the more you add, the darker it will be. This should help you make more soft and realistic shadows. Do the same thing for the light area. And don't be afraid to work at 200%-500%! |
| <table width="99%" align="left" border="0" cellpadding="0" cellspacing="0"> <tr> <td valign="top">  </tr> </table> | 5) You might find this shading a little but artificial, don't you? That's why we will use the Smudge tool to make it more realistic. Use the "finger" to manipulate the shadows and highlights. Once again, I can't help you much with this. Use your instinct. |
| <table width="99%" align="left" border="0" cellpadding="0" cellspacing="0"> <tr> <td valign="top">  </tr> </table> | 5) You can add a complementary color to make the shading more realistic. And once again it's a question of experience and practice. |
| <table width="99%" align="left" border="0" cellpadding="0" cellspacing="0"> <tr> <td valign="top"> 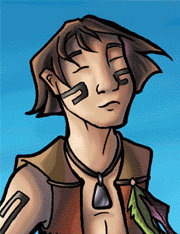 </tr> </table> | 5) Continue like that for the rest of your picture. You can stop here and your picture would look perfectly fine. But you can also add some highlights to the shiniest areas. To do so, you'll have to create a new layer Over your line art. Give a name to this layer and set it to screen. |
| <table width="99%" align="left" border="0" cellpadding="0" cellspacing="0"> <tr> <td valign="top">  </tr> </table> | 5) Using a soft brush, go and add some light color (brown for the hair, etc...( spots where you want the highlights to be. That's all! I hope this tutorials have helped you! And by the way, don't forget to save your work often! Now if you want to have a closer look at the most difficult part of the image, keep reading! |
A Closer look on... Creating nice texture effect in Photoshop is not that hard. Let's take a closer look on some of the more complicated part of the image. | |
| <table width="99%" align="left" border="0" cellpadding="0" cellspacing="0"> <tr> <td valign="top">  </tr> </table> | The grass As you can see on this close up, I only added some yellow stroke over my green background. Using a 50% opacity soft brush, I added large strokes firts and then smaller ones. I used the same technique for the darker areas. |
| <table width="99%" align="left" border="0" cellpadding="0" cellspacing="0"> <tr> <td valign="top">  </tr> </table> | The sky and clouds First, the sky: I started with a plain gradient of a darker and lighter blue. To give it a less artificial look, I used a 30% opacity soft brush to add strokes of lighter and darker blue on it. It's hard to explain it here. For the cloud, I used 3 different layers: one with the basic color (use a soft brush: 30% opacity), one with the highlights (same color as the base, same brush) over the base layer, and one for the shadow (soft brush : 30% opacity, darker color) over the base color layer. This is a more complicated technique that deserve it's own tutorial. |
| <table width="99%" align="left" border="0" cellpadding="0" cellspacing="0"> <tr> <td valign="top"> 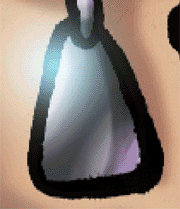 </tr> </table> | Metal effects To create a somewhat realistic metal effects, all you'll need are a few gray shades! Depending on the surrounding colors, you can use warm or cold greys. For this picture, I used warm greys. Try to find a metallic object and look at it. Try to see how light reflect on it. Use the shade of greys to make it 3 dimensionnal but remember that what you are coloring is NOT a dull grey object. It reflect it's enviroment. The amulet reflected the skin of the character but also the sky. That's why I have warmer color at the bottom and colder on the top! Painting metallic objects is quite hard and the best way to improve is by observing real life object. |

3loomi- الجنس :

عدد المساهمات : 826
النقاط : 52319
التقييم : 10
تاريخ التسجيل : 2010-09-01
Re: Color and Draw - Photoshop
![]() by 3loomi Wed Dec 29, 2010 3:32 am
by 3loomi Wed Dec 29, 2010 3:32 am
[b]PhotoShop - Coloring
Written by swat - www.swatart.com
[/b]
| Here you will be taught how to color inks using photoshop. First you will need to go to google or anywhere else and find a image to color. |
| 1) | First open the sketch that you would like to color. I chose an Iron Man sketch done by Sam Liu. Once you have it open, go up to Image > Adjust > Levels. Move the middle bar to the left till the image is black enough. Once your done with that, clean up the smudge that occured from doing that. |
| 2) | First thing is you need to do is set the sketch layer to multiply. Next, go to layer new layer and set this layer underneath the original sketch. Choose the color you want and color it in with the brush tool on 100%. Dont worry about going over the black lines cause it won't matter. Next, once your done with one color, make a new layer and set this one underneath the first color layer and color the same way. Keep making new layers for every new color. What I have so far is shown below. |
 |
| 3) | After you have all the colors done you want to add some shading. Usually the sketch is already shaded but you just wanna touch up on it. Go to the dark spots of your sketch and color in the with black. Make sure your brush is between 5-10%. I find it works best that way. Again make a new layer for each colors shading. This step will not be as fast as the others. Its going to take time and patience. |
 |
| 4) | Once you have all the shading done, you want to move on to highlighting. This is where your going to have to expiriment on which colors make the image stand out and shine the best. For mine I chose a more whiter yellow for the yellow layer and for the red I chose a red-orange color. As like before you want a new layer for each new highlight on each color. This step as well is going to take a lot of time and patience. |
 |
| 5) | Once you have that done and it looks all good you just need to add the finishing touches. My final image is below. Hope yours is better than mine. |
 |
.iTt{
FONT-FAMILY: Verdana, Arial, Helvetica;
FONT-SIZE: 11px;
FONT-STYLE: normal;
FONT-WEIGHT: normal;
COLOR: black;
BACKGROUND-COLOR: lightyellow;
BORDER: black 1px solid;
PADDING: 2px;
}

3loomi- الجنس :
عدد المساهمات : 826
النقاط : 52319
التقييم : 10
تاريخ التسجيل : 2010-09-01
Re: Color and Draw - Photoshop
![]() by 3loomi Wed Dec 29, 2010 3:34 am
by 3loomi Wed Dec 29, 2010 3:34 am
Drawing with photoshop
Requirement: Photoshop
Difficulty: Moderate
Author: Lina/Lina01
Heres what you might get.


Like
this tutorial? Then join here it's free and you will get access to
other areas, and be able to upload signatures, and try out other cool
things like the arcade.
http://www.tutorialized.com/view/tutorial/Drawing-Coloring-with-Photoshop/11079
Requirement: Photoshop
Difficulty: Moderate
Author: Lina/Lina01
Heres what you might get.
Like
this tutorial? Then join here it's free and you will get access to
other areas, and be able to upload signatures, and try out other cool
things like the arcade.
http://www.tutorialized.com/view/tutorial/Drawing-Coloring-with-Photoshop/11079
3loomi- الجنس :
عدد المساهمات : 826
النقاط : 52319
التقييم : 10
تاريخ التسجيل : 2010-09-01
Re: Color and Draw - Photoshop
![]() by 3loomi Wed Dec 29, 2010 3:43 am
by 3loomi Wed Dec 29, 2010 3:43 am
How to Color and Draw on Adobe Photoshop 6
Creating a New Document
Sketching
Outlining
Coloring Method 1
Coloring Method 2
Shading Method 1
Shading Method 2
Finished
Creating a New Document
- 1

 Open a document
Open up a new document of course, so you click "FILE", "NEW" and you set the dimensions.
google_protectAndRun("ads_core.google_render_ad", google_handleError, google_render_ad);
Ads by GoogleFree 3D CAD for Architect
ArchiCAD 14 — 3D modeling tool for architects & interior designers!
myArchicad.com/freeDownload - 2
 Set the size
Set the width and height dimensions, here you see 500x500 pixels, but you choose whatever you would like. - 3
 Create a layer
Make a layer. Once you have your canvas size
the way you want, you create a new layer. First, you have to click
"layer" "new" "layer." And name your layer. Name it "white" - 4
 Fill with white
Fill in the new layer with the color white. - 5
 Create a new layer
Create a new layer. Now you will start to sketch out what you would like to draw. Click on the colors and pick one.


Sketching
- 1
 Pick a brush
Pick a brush and apply the settings - 2
 Description
Draw. You don't have to worry about neatness, just draw away! Here's a sketch.


Outlining
- 1
 Outline
Outline it. Now that you have your sketch you need to outline it to make it neater. Create a new layer. Click the pen tool, and click "freeform pen tool" - 2
 Description
Outline one of your lines. Since the pen tool smooths your line, you may need to erase and redraw it. (not the whole thing only the line, don't worry) - 3
 Stroke the line
You have a line. Now you need to stroke it. Right click and click "Stroke Path" and then - 4
 Select paintbrush
Set to paintbrush or pencil - 5
 Stage 1 complete
You should have this now. - 6
 Delete the old line
Delete the rough sketch. Delete the old line by doing this. Right click and select delete path. - 7
 Repeat
Repeat for all the rest of the drawing. Here we see this: - 8
 Bad blue lines
Clean up. You don't want the yucky blue lines right? You do this: - 9
 Stage 2 complete
You have this. - 10
 Begin to taper
Look at the lines. Some are thick and misshapen what we need to do is taper. - 11
 Use the eraser
Grab the eraser and taper the lines by erasing the edges of the line. - 12
 Complete the lines
Do it to the rest of the lines. - 13
 Time to color
Add color.Now it is time to add color.


Coloring Method 1
- 1
 Pick a color
Go to the colors and pick one that you would like. Create a new layer Okay, now you color it! - 2
 Show the line art
Move the "lineart" layer above the "color" layer. - 3
 Stage 4 complete
 - 4
 Color and color
Continue to add more color. - 5
 All lines removed
Use the magic wand. Now the lines are all out of the image right? That can be easily fixed. Click the "magic wand tool" - 6
 Click the line art layer
Click on the line art layer and use the wand and click the canvas. This should happen: - 7
 Base colors complete
Go down to the color layer and hit "delete on your keyboard, extra coloring is gone - 8
 Click Ctrl+D
Click ctrl+D. Okay. So repeat until all your coloring is finished.


Coloring Method 2
- 1

Create a new layer, and block off any unclosed areas, such as the hands and torso. (Temporary) - 2

Return to your color layer. Select an area
you wish to color with the magic wand tool, and color it in. The magic
wand will not let you color outside of lines, so you need to select
each area you want to color. - 3

Delete the "capped" layer and you should end up with this. You may also want to return the "lineart" layer to above the "color" layer, so the lines aren't distorted.


Shading Method 1
- 1
 Shade and highlight
Shade and highlight Create a new layer Click the airbrush and set to 10% opacity at the top, and pick a color darker then your original. Wherever you think there is shade go over with your airbrush. - 2
 Keep going
Keep going with the body. - 3
Now pick a color lighter the your original color and where you think there's light, highlight it! Add details like the eyes.


Shading Method 2
- 1
Instead of using the airbrush, use the dodge (brighten) and the burn (darken) tools to shade your drawing. Adjust the exposure to effect the amount of darkening/brightening.
Finished
- 1
 The final result
The final result
google_protectAndRun("ads_core.google_render_ad", google_handleError, google_render_ad);
Ads by GoogleFree Downloadable Videos
Download The Most Viewed End Time Free Bible Prophecy Videos Online!
www.WorldsLastChance.com/Videos
Bücher Portofrei
Der günstigste & schnellste Weg zu Ihrem Buch. Jetzt gleich bestellen!
www.buecher.de/Buecher

3loomi- الجنس :
عدد المساهمات : 826
النقاط : 52319
التقييم : 10
تاريخ التسجيل : 2010-09-01
» to draw in photoshop
» Using Photoshop to draw and paint a candle
» Photoshop design feather effect in photoshop
» draw Blackberry mobile - photoshop
» How to Draw a Realistic Mobile Phone with Photoshop
» Using Photoshop to draw and paint a candle
» Photoshop design feather effect in photoshop
» draw Blackberry mobile - photoshop
» How to Draw a Realistic Mobile Phone with Photoshop
Page 1 of 1
Permissions in this forum:
You cannot reply to topics in this forum|
|
|