 Search
Bulb Modelling Tutorial
Page 1 of 1

Bulb Modelling Tutorial
![]() by evergreen Tue May 15, 2012 6:28 am
by evergreen Tue May 15, 2012 6:28 am
Bulb Modelling Tutorial - Page 1
http://planetpixelemporium.com/tutorialpages/bulb1.html
| I've not attempted a tutorial on modelling before, and it is not my intention to explain what the effect of each tool used in the process is, but to give an overview of the process itself. This tutorial is not aimed at beginners to C4D - it assumes that you know how to use the poly modelling tools and how to navigate the various attribute panes in the program. A fellow emailed me asking how to do the base of a lightbulb, as seen in a couple of my renderings, so I thought this would make a good subject to introduce a few concepts. There are a LOT of pictures so this tutorial is spread across a number of pages. Lets begin: | |
 | |
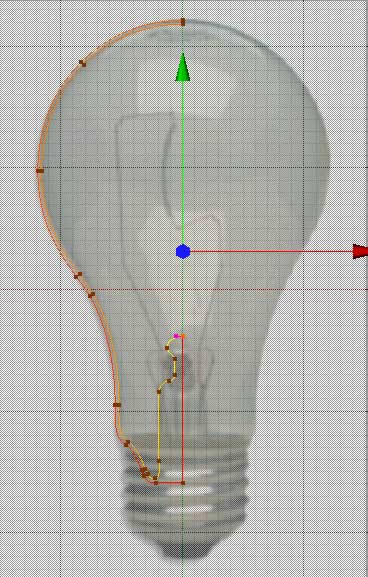
| Step 1: I used Adobe Illustrator to create the curve for the outline of the bulb itself. I could have taken a photo of a lightbulb, but being lazy, I used Google Image finder to locate one from the internet. A quick trip through photoshop straightened the image up, and I placed the photo into Illustrator to use as a guide. Here I have placed a guide through the center of the photo, and have drawn a bezier curve around the glass portion of the bulb. You could simply use the bezier curve tools in Cinema 4D to do this, but the next couple of steps will show you why I chose not to. | |
 | |
| Step 2: I gave the curve I drew thickness by increasing the stroke value. In this example I used 3 points so that the effect would be visible in this tutorial. In practice, the real thickness of a lightbulb glass would be 1 point or less. Once I am happy with the curve, I chose Object/Path/Outline Stoke. This turns my single line bezier into a precise width double line - something extremely difficult to do with Cinema 4D's bezier curve tools. | |
| |
| |
this site works best on Firefox: |

evergreen- الجنس :

عدد المساهمات : 1497
النقاط : 59928
التقييم : 34
تاريخ التسجيل : 2010-02-03 -

Re: Bulb Modelling Tutorial
![]() by evergreen Tue May 15, 2012 6:30 am
by evergreen Tue May 15, 2012 6:30 am
 | |
| Zoom in and make sure that the curve hits the guide line at the top, and the two points there are lined up with the guide exactly. | |
 | |
| Step 3: Select the line segment joining the two points at the bottom of the curve, and delete it. We will be drawing more of the glass at this point. | |
 | |
| Step 4: Complete the curve for the glass. You'll have to sort of wing it, using the photo as a guide. In the example here I pretty much ignored the details in the photograph and created a column inside the glass for the wires to attach to. Every make of lightbulb is slightly different so you can use some artistic license here. Make sure the end points line up on the guide exactly. Press CTRL-R to make the rulers visible (if they are not already visible). In the upper left corder of the ruler you will see too crossed dotted lines. This is the zero point of the ruler. By clicking and dragging on those lines, you can reposition where the zero, or origin point, of your drawing is. Now, drag the zero point on the rulers down to the bottom point of your glass curve so that the origin sits there exactly. This point will now be positioned at 0,0,0 when this curve is imported into Cinema 4D. Remove the guide line (important!) and the bulb image, and save the curve out as an Illustrator EPS file, version 6.0, no preview, no thumbnail. | |
< Previous Page | |
| |
| |
this site works best on Firefox: |
evergreen- الجنس :
عدد المساهمات : 1497
النقاط : 59928
التقييم : 34
تاريخ التسجيل : 2010-02-03 -
Re: Bulb Modelling Tutorial
![]() by evergreen Tue May 15, 2012 6:31 am
by evergreen Tue May 15, 2012 6:31 am
 | |
| Step 5: Now we are ready to start in Cinema 4D. Create a new material, and place your lightbulb template image in the color channel. Take note of the pixel dimensions of the image. Create a Plane object, orientation in -Z and make the width and height of the plane object to be the same as the pixel dimensions of your template image. Apply the material to the plane. Set the material transparency to ON, and the plane object will "ghost" back, which will make it easier to see your work as you go. Pull the plane back in Z a bit to give you room to work on the bulb as you create it. Go to the Object hierarchy and add a DISPLAY tag to this object. Tick off the USE box on the first tag attribute, and change the display mode to GOURAUD shading. This will allow it to be visible in the various views. | |
 | |
| Step 6: From the file menu, MERGE the curve you created in Illustrator. First step is to switch to Axis mode, and reposition the axis point to a world value of 0 in X. Hit F4 to switch to FRONT projection, and then switch back to Object mode to position/scale the curve till it matches up with the template image. Since we were careful to position the zero point at the edge of the curve in Adobe Illustrator, you should only need to position the object in the Y axis only, and scale it to fit the template. Its important that the right most points of the curve remain at a world value of 0 in X. | |
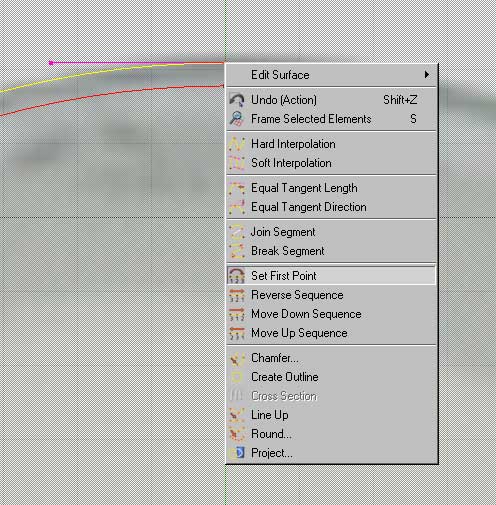 | |
| Step 7: Switch to Point mode, and click the topmost point of the curve, and right click to bring up the contextual menu. Choose Set First Point. Go to the curve attributes and turn off "Close Curve", What should happen is that the curve will have no connecting segment between the two points at the top of the curve. Add a Lathe object to the scene, and parent it to the curve. | |
< Previous Page | |
| |
| |
this site works best on Firefox: |
evergreen- الجنس :
عدد المساهمات : 1497
النقاط : 59928
التقييم : 34
تاريخ التسجيل : 2010-02-03 -
Re: Bulb Modelling Tutorial
![]() by evergreen Tue May 15, 2012 6:33 am
by evergreen Tue May 15, 2012 6:33 am
 | |
| Step 8: Add a Cylinder object to the scene, with the following attributes: Radius and Height to line up with your template as shown above, 18 Height Segments (If you follow along the tutorial you will see later that this value should have been 14 height segments but its sometimes valuable to see how to fix mistakes later), 8 Rotation segments, and 1 Cap Segment. Once its positioned and sized correctly Click the Make Editable icon, and switch to Point Mode. | |
 | |
| Step 9: This is the part where you will be scratching your head trying to figure out how this series of steps results in the screw threads of the base. I am not sure I understand it myself. But it works. Chose the Rectangle Selection tool, turn off "Only Select Visble Elements" in the Active Tool Properties, and while holding down the SHIFT key, select every fourth row of points in the cylinder, making sure to not select the first or last row. Move these points some small amount in the X direction - I used 5 units in this tutorial. | |
 | |
| Step 10: Select the next set of rows up, chosing every fourth row but do not select the top row of points. Move these points 5 units in the Z direction. | |
< Previous Page | |
evergreen- الجنس :
عدد المساهمات : 1497
النقاط : 59928
التقييم : 34
تاريخ التسجيل : 2010-02-03 -
» Art tutorial
» photoshop tutorial
» Tutorial – Smokey Eye
» Dreamweaver CS4 Tutorial
» typing tutorial
» photoshop tutorial
» Tutorial – Smokey Eye
» Dreamweaver CS4 Tutorial
» typing tutorial
Page 1 of 1
Permissions in this forum:
You cannot reply to topics in this forum|
|
|