 Search
Tutorial – Smokey Eye
Page 1 of 1

Tutorial – Smokey Eye
![]() by evergreen Mon Jan 31, 2011 8:39 pm
by evergreen Mon Jan 31, 2011 8:39 pm
[You must be registered and logged in to see this link.]
A lot of people asked for a tutorial on smokey eyes, so that’s
what I did for my first tutorial attempt. If the tutorial works out all
right, and/or learn what I need to fix, I may make another tutorial for
blending some bright colors together.
Skill Level: Beginner


You’re going to need the following supplies:
I’m using the following brushes: MAC 252, MAC 219, Philosophy
Blending, Philosophy Shadow, and a craft store paint brush. I will be
using the following products: mixing medium (water based), Silver
pigment, Black Tied e/s, Say Yeah e/s, L’Oreal Ebony e/l, Maybelline
Full ‘n Soft mascara, and Flash of Flesh l/g. The mixing medium I use
is 3 parts water, 1 part glycerin (home made), but it is supposed to be
the equivalent of MAC’s mixing medium available at stores. You could
probably get away with using say Silver Ring e/s instead of Silver
pigment, but you might need a base like Graphito paint or Bare Canvas
might work for some people. Sharkskin s/s might be workable, too!

I took my craftstore paint brush, dipped it just a TINY bit into the
mixing medium (you don’t want your brush to be too wet, just damp), and
then dab on some Silver pigment. Press the brush flat against your lid,
starting from the inside, and slowly making sweeping arches going just
past your crease all the way to your outer corner. Go lightly when it’s
above your crease, make it sort of heavy towards your lashline and fade
as you get to your crease.

It should like the photo above.
And… like this one! See, the silver pigment comes a little above your lid.
Using my Philosophy shadow brush flat against my outer lid, I take Black Tied e/s and gently tap the color onto the lid.

It should get just a little darker on the outer lid. If the line is too
harsh, gently fan the Black Tied e/s inwards towards the center of your
lid with slow, sweeping strokes with the brush held sideways.

Using the same brush, take some more Black Tied e/s and gently press it
into the middle of your crease. Slowly bring the brush from the middle
to the left, and then middle to the right parts of your crease.
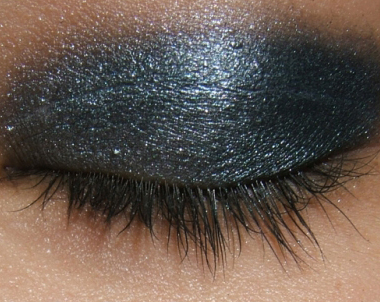
So now, your lid should look a little like the photo
above.

I used the 252 brush to pick up Say Yeah e/s and pressing it flat
against the area above my crease, sideways, on the outer portion, I
slowly dragged the color across towards just above my inner crease. You
want to apply the color similarly to how you applied the Silver pigment
earlier. Bring it just to the brow bone. And, see, harsh line!

Using my Philosophy blending brush (sort of like a blush brush, but for
your eyes!) and I’m pressing it against the harsh line and gently
dragging color upwards so that the gray/black colors are gradually
fading into the neutral color.

Then I go back to my Philosophy shadow brush and get some Say Yeah e/s
on it and press it just above my crease to help soften that harsh line.
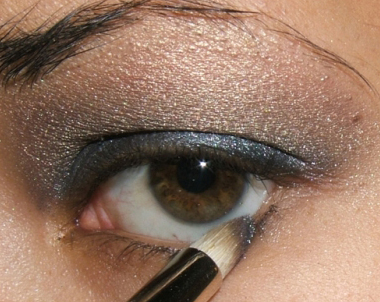
Using the 219 brush, I dip it into my Silver pigment (dry, not wet) and
use it to brush a line of silver underneath my waterline.

See, now it’s coming together.
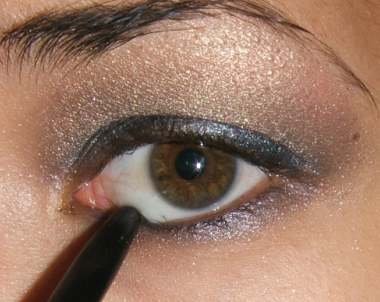
I’m applying my choice in black eyeliner, but whatever your preference will do just fine here.

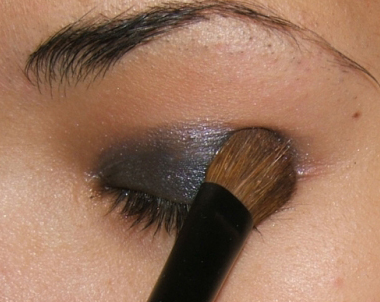
Now, let’s go back to the Philosophy blending brush and pick up a
little Black Tied e/s and tap it lightly against the outer edge of your
waterline/just below it. Then carefully bring the Black Tied e/s a
little under your lower lash line so that it helps create a gradient.
Smudge it out a little towards the outer lid/corner of your eye, too.
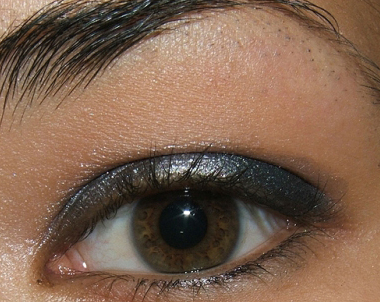
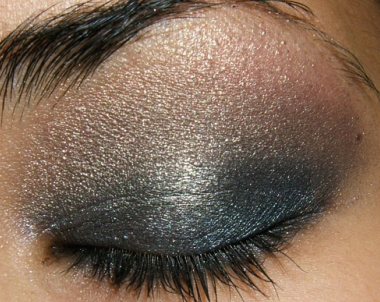
And there you have it! The photos below are just my typical open/closed/side/full shots of tonight’s smokey eyes attempt.

Any questions or comments, PLEASE leave them. I’d love feedback on this as it’s my first time & it took awhile to do!
A lot of people asked for a tutorial on smokey eyes, so that’s
what I did for my first tutorial attempt. If the tutorial works out all
right, and/or learn what I need to fix, I may make another tutorial for
blending some bright colors together.
Skill Level: Beginner
You’re going to need the following supplies:
I’m using the following brushes: MAC 252, MAC 219, Philosophy
Blending, Philosophy Shadow, and a craft store paint brush. I will be
using the following products: mixing medium (water based), Silver
pigment, Black Tied e/s, Say Yeah e/s, L’Oreal Ebony e/l, Maybelline
Full ‘n Soft mascara, and Flash of Flesh l/g. The mixing medium I use
is 3 parts water, 1 part glycerin (home made), but it is supposed to be
the equivalent of MAC’s mixing medium available at stores. You could
probably get away with using say Silver Ring e/s instead of Silver
pigment, but you might need a base like Graphito paint or Bare Canvas
might work for some people. Sharkskin s/s might be workable, too!
I took my craftstore paint brush, dipped it just a TINY bit into the
mixing medium (you don’t want your brush to be too wet, just damp), and
then dab on some Silver pigment. Press the brush flat against your lid,
starting from the inside, and slowly making sweeping arches going just
past your crease all the way to your outer corner. Go lightly when it’s
above your crease, make it sort of heavy towards your lashline and fade
as you get to your crease.
It should like the photo above.
And… like this one! See, the silver pigment comes a little above your lid.
Using my Philosophy shadow brush flat against my outer lid, I take Black Tied e/s and gently tap the color onto the lid.
It should get just a little darker on the outer lid. If the line is too
harsh, gently fan the Black Tied e/s inwards towards the center of your
lid with slow, sweeping strokes with the brush held sideways.
Using the same brush, take some more Black Tied e/s and gently press it
into the middle of your crease. Slowly bring the brush from the middle
to the left, and then middle to the right parts of your crease.
So now, your lid should look a little like the photo
above.
I used the 252 brush to pick up Say Yeah e/s and pressing it flat
against the area above my crease, sideways, on the outer portion, I
slowly dragged the color across towards just above my inner crease. You
want to apply the color similarly to how you applied the Silver pigment
earlier. Bring it just to the brow bone. And, see, harsh line!
Using my Philosophy blending brush (sort of like a blush brush, but for
your eyes!) and I’m pressing it against the harsh line and gently
dragging color upwards so that the gray/black colors are gradually
fading into the neutral color.
Then I go back to my Philosophy shadow brush and get some Say Yeah e/s
on it and press it just above my crease to help soften that harsh line.
Using the 219 brush, I dip it into my Silver pigment (dry, not wet) and
use it to brush a line of silver underneath my waterline.
See, now it’s coming together.
I’m applying my choice in black eyeliner, but whatever your preference will do just fine here.
Now, let’s go back to the Philosophy blending brush and pick up a
little Black Tied e/s and tap it lightly against the outer edge of your
waterline/just below it. Then carefully bring the Black Tied e/s a
little under your lower lash line so that it helps create a gradient.
Smudge it out a little towards the outer lid/corner of your eye, too.
And there you have it! The photos below are just my typical open/closed/side/full shots of tonight’s smokey eyes attempt.
Any questions or comments, PLEASE leave them. I’d love feedback on this as it’s my first time & it took awhile to do!

evergreen- الجنس :

عدد المساهمات : 1497
النقاط : 61898
التقييم : 34
تاريخ التسجيل : 2010-02-03 -

Page 1 of 1
Permissions in this forum:
You cannot reply to topics in this forum