 Search
Use The Displace Filter & Displacement Maps To Make A Realistic Flag
Page 1 of 1

Use The Displace Filter & Displacement Maps To Make A Realistic Flag
![]() by discovery Mon Apr 02, 2012 1:01 am
by discovery Mon Apr 02, 2012 1:01 am
Use The Displace Filter & Displacement Maps To Make A Realistic Flag

Liquid pixels - wrapping pixels over undulating silk
The layer blend modes are an effective way of merging or
blending a pattern or graphic with a three-dimensional form. By using
the blend modes the flag in this project can be modified to respect the
color and tonality of the undulating silk beneath it.

The highlights and shadows that give the silk its shape can
however be further utilized to wrap or bend the flag so that it obeys
the material’s shape and sense of volume. This can be achieved by using
the Displace filter in conjunction with a ‘displacement map’. The ‘map’
defines the contours to which the flag must conform. The final effect
can be likened to ‘shrink-wrapping’ the flag to the 3-D form of the
undulating silk.


How it works: The brightness level of each
pixel in the map directs the filter to shift the corresponding pixel of
the selected layer in a horizontal or vertical plane. The principle on
which this technique works is that of ‘mountains and valleys’. Dark
pixels in the map shift the graphic pixels down into the shaded valleys
of the 3-D form whilst the light pixels of the map raise the graphic
pixels onto the illuminated peaks of the 3-D form.


STEP 1
A silk dressing gown was photographed using the
available light. For this image to act as an effective displacement map
the contrast must however be expanded. An effective way of expanding
contrast in Photoshop Elements is to duplicate the layer and set the top
layer to ‘Overlay’ blend mode. Note the changes to the histogram by
viewing the histogram in the Histogram palette.


STEP 2
Go to the Image menu and from the Mode submenu
select ‘Grayscale’. Choose the option ‘Flatten’ when the Warning dialog
box appears.
Note > The displacement map must be in Grayscale otherwise the color channels will upset the appropriate displacement effect.
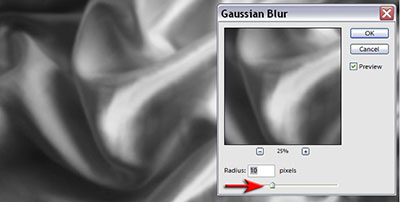
STEP 3
To further improve the effectiveness of the
displacement map we must blur the image slightly. This effect of
blurring the map will smooth out the lines of the flag as it wraps
around the contours of the silk. Too much blur and the undulations will
be lost, too little and the lines of the flag will appear jagged as it
is upset by any minor differences in tone. Go to ‘Filter > Blur >
Gaussian Blur’ and start by selecting a Radius of around 10 pixels.
Increase or decrease this radius when working with images of a different
resolution.

STEP 4
Save the image (displacement map) as a
Photoshop (PSD) file. Close the blurred Grayscale file as the map is now
complete. You will need to choose this file when the Displacement
filter asks for the location of your map, so make a note of where it has
been saved to on your computer.

STEP 5
Open or select the RGB silk file that has not been blurred. Also
open the flag image. With the flag image as the active window, choose
‘All’ from the Select menu and then choose ‘Copy’ from the File menu.
Now make the silk image the active window and choose ‘Paste’ from the
File menu. Alternatively you can just drag the thumbnail of the flag
image in the Layers palette into the image window of the silk image if
you can see both image windows on your desktop.

Set the blend mode of the flag layer to ‘Multiply’. If you are
intending to displace a graphic or a texture it is worth ensuring that
you have some elbow room (when we displace the flag it will come away
from, and reveal, the edges of the background layer if they are the same
size). Use the Free Transform command to enlarge the flag layer so that
it is a little larger than the background layer.


STEP 6
Go to ‘Filter > Distort > Displace’.
Enter in the amount of displacement in the Horizontal and Vertical
fields of the Displace dialog box. The size of the displacement is
dependent on the resolution of the image you are working on. Choose
amounts of 40 for both fields for the Flag.jpg used in this project.
Increasing the amount greater than 60 for either the Horizontal or
Vertical scale will increase the amount of distortion in this project
image, but will also start to break off islands of color from the design
of the flag indicating that the limit of the effect has been exceeded.
Choose the displacement map you created earlier to complete this step.
Your flag should now miraculously conform to the contours of the silk.
If you are not entirely happy with the results go to the Edit menu and
choose ’Undo’. Repeat the process choosing smaller or greater amounts in
the Displace dialog box.
Note > It helps if the graphic or pattern
image file you are displacing is slightly larger than the image file you
created the map for. This will ensure that no gaps appear between the
distorted graphic and the edge of the image window.


STEP 7
Add an adjustment layer and drag the Highlight slider to the
start of the histogram to extend the dynamic range and make the
highlights and midtones appear brighter. Your dramatic and colorful
background is now complete.
http://www.photoshopsupport.com/elements/tutorials/displace-filter/displacement-map.html
Liquid pixels - wrapping pixels over undulating silk
The layer blend modes are an effective way of merging or
blending a pattern or graphic with a three-dimensional form. By using
the blend modes the flag in this project can be modified to respect the
color and tonality of the undulating silk beneath it.
The highlights and shadows that give the silk its shape can
however be further utilized to wrap or bend the flag so that it obeys
the material’s shape and sense of volume. This can be achieved by using
the Displace filter in conjunction with a ‘displacement map’. The ‘map’
defines the contours to which the flag must conform. The final effect
can be likened to ‘shrink-wrapping’ the flag to the 3-D form of the
undulating silk.
How it works: The brightness level of each
pixel in the map directs the filter to shift the corresponding pixel of
the selected layer in a horizontal or vertical plane. The principle on
which this technique works is that of ‘mountains and valleys’. Dark
pixels in the map shift the graphic pixels down into the shaded valleys
of the 3-D form whilst the light pixels of the map raise the graphic
pixels onto the illuminated peaks of the 3-D form.
STEP 1
A silk dressing gown was photographed using the
available light. For this image to act as an effective displacement map
the contrast must however be expanded. An effective way of expanding
contrast in Photoshop Elements is to duplicate the layer and set the top
layer to ‘Overlay’ blend mode. Note the changes to the histogram by
viewing the histogram in the Histogram palette.
STEP 2
Go to the Image menu and from the Mode submenu
select ‘Grayscale’. Choose the option ‘Flatten’ when the Warning dialog
box appears.
Note > The displacement map must be in Grayscale otherwise the color channels will upset the appropriate displacement effect.
STEP 3
To further improve the effectiveness of the
displacement map we must blur the image slightly. This effect of
blurring the map will smooth out the lines of the flag as it wraps
around the contours of the silk. Too much blur and the undulations will
be lost, too little and the lines of the flag will appear jagged as it
is upset by any minor differences in tone. Go to ‘Filter > Blur >
Gaussian Blur’ and start by selecting a Radius of around 10 pixels.
Increase or decrease this radius when working with images of a different
resolution.
STEP 4
Save the image (displacement map) as a
Photoshop (PSD) file. Close the blurred Grayscale file as the map is now
complete. You will need to choose this file when the Displacement
filter asks for the location of your map, so make a note of where it has
been saved to on your computer.
STEP 5
Open or select the RGB silk file that has not been blurred. Also
open the flag image. With the flag image as the active window, choose
‘All’ from the Select menu and then choose ‘Copy’ from the File menu.
Now make the silk image the active window and choose ‘Paste’ from the
File menu. Alternatively you can just drag the thumbnail of the flag
image in the Layers palette into the image window of the silk image if
you can see both image windows on your desktop.
Set the blend mode of the flag layer to ‘Multiply’. If you are
intending to displace a graphic or a texture it is worth ensuring that
you have some elbow room (when we displace the flag it will come away
from, and reveal, the edges of the background layer if they are the same
size). Use the Free Transform command to enlarge the flag layer so that
it is a little larger than the background layer.
STEP 6
Go to ‘Filter > Distort > Displace’.
Enter in the amount of displacement in the Horizontal and Vertical
fields of the Displace dialog box. The size of the displacement is
dependent on the resolution of the image you are working on. Choose
amounts of 40 for both fields for the Flag.jpg used in this project.
Increasing the amount greater than 60 for either the Horizontal or
Vertical scale will increase the amount of distortion in this project
image, but will also start to break off islands of color from the design
of the flag indicating that the limit of the effect has been exceeded.
Choose the displacement map you created earlier to complete this step.
Your flag should now miraculously conform to the contours of the silk.
If you are not entirely happy with the results go to the Edit menu and
choose ’Undo’. Repeat the process choosing smaller or greater amounts in
the Displace dialog box.
Note > It helps if the graphic or pattern
image file you are displacing is slightly larger than the image file you
created the map for. This will ensure that no gaps appear between the
distorted graphic and the edge of the image window.
STEP 7
Add an adjustment layer and drag the Highlight slider to the
start of the histogram to extend the dynamic range and make the
highlights and midtones appear brighter. Your dramatic and colorful
background is now complete.
http://www.photoshopsupport.com/elements/tutorials/displace-filter/displacement-map.html

discovery- الجنس :

عدد المساهمات : 1002
النقاط : 56427
التقييم : 12
تاريخ التسجيل : 2010-04-28
» Make a Realistic Wine Glass in 10 Minutes using 3D Studio Max
» Patriotic Text Using Displacement Masks
» Water Ripples filter
» Painting with Fire Using Photoshop’s Liquify Filter
» Hair cutting filter for adobe photoshop in Title/Summary
» Patriotic Text Using Displacement Masks
» Water Ripples filter
» Painting with Fire Using Photoshop’s Liquify Filter
» Hair cutting filter for adobe photoshop in Title/Summary
Page 1 of 1
Permissions in this forum:
You cannot reply to topics in this forum