 Search
Pencil Sketch to Smooth Digital Shading
Page 1 of 1

Pencil Sketch to Smooth Digital Shading
![]() by 3loomi Wed Dec 29, 2010 3:40 am
by 3loomi Wed Dec 29, 2010 3:40 am
Pencil Sketch to Smooth Digital Shading
By Troy Packer
Digital Art Tutorial Recommended for Intermediate Level Photoshop Users
I am a digital artist, however, I tend to start a lot of my concept
art as a pencil sketch. The following tutorial is a step by step look
at how I develop a pencil sketch using Adobe Photoshop.
This technique is quick and very easy to apply and is great for all of
you people out there who need to add a professional touch to your
portfolios.
Remember this tutorial is designed for intermediate level Photoshop
users, so I’m not going to bog down the page with explanations on how
to do every little function.
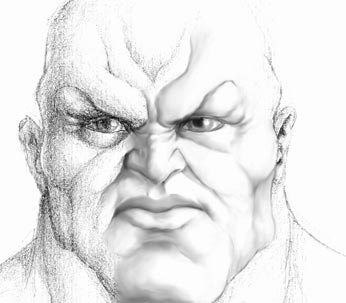
1) The Pencil Sketch
The first thing to do is to scan your pencil sketch into Photoshop. You can do a bit of tidying up at this stage if you like.
Completely desaturate the image (Ctrl + Shft + U).

The image above is my pencil sketch that I’m starting with.
A good way to check proportions of your artwork is to flip the image
horizontally (Edit >> Transform >> Flip Horizontal). This
approach should be used as much as possible.
2) The Start of the Smudge Tool
Next we go to the smudge tool and go about blending the pencil marks
together. I use a soft brush for this as the blending is much smoother.
3) A Few More Pass
This is what we have once we blend all of the pencil marks. I know
it doesn’t look like much, with a few more passes it will start to come
together.

4) Adjust Levels
The next step is to adjust the levels to give it more contrast and bring out some more tones in the mid range.
Hit Ctrl+L to adjust the Levels.
You can now see that the first smudge pass needs a bit of a tidy up.

5) Smoothing the Mid Tones
Now we do another smudge pass to clean up and smooth it all out. Be
sure to even out the tones. This stage really brings out the forms of
the face.

6) Adjust Levels Again
We do another Level adjustment here to give the image more depth. It
is starting to come together now, and the form of the face is much
clearer.
Still working on the same layer, I also go over specific areas with the Dodge and Burn tools to add a little more contrast.

7) Obsession with Detail
Now is the time to add in more detail. Details such as: wrinkles,
cuts, scars, veins and other imperfections can be applied to break up
the smoothness. How long you spend on this stage is up to you. If you
are creating a masterpiece obviously you want to really concentrate on
this stage. Again use the smudge tool, along with the Dodge and Burn
tools.
You will notice in the picture below where wrinkles already existed
around the eye, I have added a lot more smaller scaling down wrinkles.
The lips have become more realistic with more creases added.

The picture below is the end result of the smudge technique. I ended
up adjusting the face proportions a little, again just using the smudge
tool.
I’ve increased the shade values a little in some areas and decreased it in others…just a lot of tweaking.

This tutorial continues on the next page >>
By Troy Packer
Digital Art Tutorial Recommended for Intermediate Level Photoshop Users
I am a digital artist, however, I tend to start a lot of my concept
art as a pencil sketch. The following tutorial is a step by step look
at how I develop a pencil sketch using Adobe Photoshop.
This technique is quick and very easy to apply and is great for all of
you people out there who need to add a professional touch to your
portfolios.
Remember this tutorial is designed for intermediate level Photoshop
users, so I’m not going to bog down the page with explanations on how
to do every little function.
1) The Pencil Sketch
The first thing to do is to scan your pencil sketch into Photoshop. You can do a bit of tidying up at this stage if you like.
Completely desaturate the image (Ctrl + Shft + U).
The image above is my pencil sketch that I’m starting with.
A good way to check proportions of your artwork is to flip the image
horizontally (Edit >> Transform >> Flip Horizontal). This
approach should be used as much as possible.
2) The Start of the Smudge Tool
Next we go to the smudge tool and go about blending the pencil marks
together. I use a soft brush for this as the blending is much smoother.
3) A Few More Pass
This is what we have once we blend all of the pencil marks. I know
it doesn’t look like much, with a few more passes it will start to come
together.
4) Adjust Levels
The next step is to adjust the levels to give it more contrast and bring out some more tones in the mid range.
Hit Ctrl+L to adjust the Levels.
You can now see that the first smudge pass needs a bit of a tidy up.
5) Smoothing the Mid Tones
Now we do another smudge pass to clean up and smooth it all out. Be
sure to even out the tones. This stage really brings out the forms of
the face.
6) Adjust Levels Again
We do another Level adjustment here to give the image more depth. It
is starting to come together now, and the form of the face is much
clearer.
Still working on the same layer, I also go over specific areas with the Dodge and Burn tools to add a little more contrast.
7) Obsession with Detail
Now is the time to add in more detail. Details such as: wrinkles,
cuts, scars, veins and other imperfections can be applied to break up
the smoothness. How long you spend on this stage is up to you. If you
are creating a masterpiece obviously you want to really concentrate on
this stage. Again use the smudge tool, along with the Dodge and Burn
tools.
You will notice in the picture below where wrinkles already existed
around the eye, I have added a lot more smaller scaling down wrinkles.
The lips have become more realistic with more creases added.
The picture below is the end result of the smudge technique. I ended
up adjusting the face proportions a little, again just using the smudge
tool.
I’ve increased the shade values a little in some areas and decreased it in others…just a lot of tweaking.
This tutorial continues on the next page >>

3loomi- الجنس :

عدد المساهمات : 826
النقاط : 52529
التقييم : 10
تاريخ التسجيل : 2010-09-01
» Santana - Smooth (feat. Rob Thomas)
» 33 Digital Painting Tutorials
» المكتبات الرقمية Digital Libraries
» Basic Principles of Digital Matte Painting
» Download Digital Scrapbooking Software – For FREE
» 33 Digital Painting Tutorials
» المكتبات الرقمية Digital Libraries
» Basic Principles of Digital Matte Painting
» Download Digital Scrapbooking Software – For FREE
Page 1 of 1
Permissions in this forum:
You cannot reply to topics in this forum|
|
|