 Search
Basic Principles of Digital Matte Painting
Page 1 of 1

Basic Principles of Digital Matte Painting
![]() by mega Tue Mar 01, 2011 5:51 am
by mega Tue Mar 01, 2011 5:51 am
Basic Principles of Digital Matte Painting
Digital Matte Painting is a huge creative field that can add wonder and
excitement to static film shots. Learn about digital matte painting
principles, like set extension, camera mapping, as well as professional
tips that matte painters employ
Introduction
Ever wonder how those incredible scenes of panoramic vistas,
impossible futuristic cities, or fantastic alien worlds come to life?
It’s all through the magic of matte painting. If only I had a dollar
(hey, inflation!) for every time someone responded, “Map painting?” But
you know what I’m talking about, right? If you don’t, a brief history
lesson is in order.
Ages ago, extremely talented artists painted these realistic scenes
on large sheets of glass. It really is a lost art nowadays. The painting
included blank areas that would get filled in with live action. The
filmed segments were optically composited with the painting for the
final result. A matte is a solid shape that is used to block out areas
of the film frame so that no image gets exposed there. A simple matte
shot would require a shot of the painting with a matte to block out the
live area, the film sequence with a matte to block out everything but
the live area, and a final piece of film for everything to be exposed
onto.
The Digital Revolution
With the invention of Adobe Photoshop, things began to change. What
used to require laborious work in a film studio with several lengths of
film and expensive, specialized cameras can now be done on a home
computer with easily available software. No matter how you approach it,
Photoshop has become an integral part of the process. The simplest matte
paintings are ones in which the camera is stationary throughout the
entire sequence. This is called a locked-off shot. Creating a matte
painting for this kind of shot can be fairly easy. Only one frame, or
plate, of the footage is needed. It can be opened in Photoshop and the
new areas painted right on top.
The Right Size
The first thing to decide is what size to make your painting. In
Photoshop, set your Image Size in pixel increments. Don’t worry about
inches or Resolution; they don’t matter here. All you care about is
pixel width and height. How big your painting’s dimensions should be
depends on its intended use. DVD is 720×480 pixels. HD is 1920×1080
pixels. Film sizes start at 2048×1080 (commonly called 2K) and can go up
from there to 3K, 4K, and beyond.
For many special effects studios, the exact resolution they work in
is proprietary. So the size to make your image depends on what medium
you are doing a matte painting for. A little trick employed by most
professional matte painters is to work at 150 or 200% of the final size.
This is because imperfections and painted artifacts get minimized when
the final image is sized down. This technique can produce detail that is
hard to paint by hand and can also get rid of some traces of hand
painting. So, if you are doing a matte painting for HD footage, you may
want to work in 2880×1620 or even 3840×2160 pixels.
You can see how easy it is to end up with huge files, so a fast
processor and lots of RAM are essential. Also, remember to work in RGB
mode, which has a larger color gamut than CMYK. Photoshop works natively
in RGB; some of its filters and functions won’t work in CMYK. Some jobs
may even require working in 16-bit color mode for smoother transitions
and gradients.
Set Extension
A common application of matte painting is set extension. This is
where only the background immediately behind the action is filmed and
for practical, budgetary, or other reasons, the rest must be painted in
later. The simplest set extensions are on locked off shots. In working
on this kind of shot, the first thing to do is determine the perspective
of the scene by finding its vanishing points. This is easily
accomplished with the line tool in Photoshop. Use bright colors so that
the lines stand out from the background. A good tip here is to use
vector lines on shape layers so that they can easily be repositioned
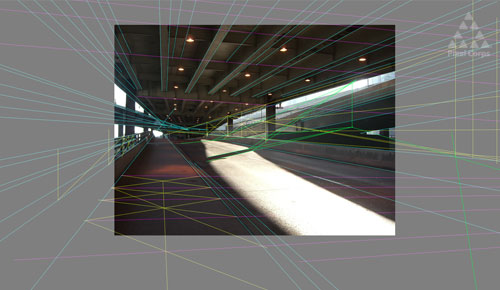
Filling in the nonexistent set is mainly done with the brush and
clone tools. Pick colors directly from the source plate so that your new
painting will match. But a close inspection reveals that hand-painted
areas lack the photographic grain found in the plate. Since the grain in
the footage animates, it is usually added back in during compositing,
but the matte painter may need to provide an alpha channel of the new
painted area to the compositor.
If you need to add the grain in for a still or to see how closely
your painting matches the plate, Photoshop’s Grain, Film Grain, and Add
Noise filters are very helpful. The Grain filter is perhaps the most
useful choice, because it has different types you can choose to best
match your photo. Apply the grain to a layer filled with 50% gray and
set to Overlay blending mode. The gray becomes transparent and all you
will see on that layer is the grain, which you can take down in opacity
to match your plate. Usually, only a small percentage is needed. This
grain layer’s opacity is 8% and it matches the plate seamlessly.
Camera Mapping
Thanks to advances in 3D animation, matte paintings no longer need to
be static shots. Simple geometry can be built in a 3D environment that
matches the scene. The matte paintings are then projected onto those
shapes, similar to how slides are projected onto a screen. The painting
is no longer a flat, 2D image, but has some dimension to it. This
technique is known as camera mapping and it allows a virtual camera to
be animated in 3D space around the matte painting.
The difference in depth allows for parallax, where objects closer to
the camera move more than objects farther away. Because the projected
paintings may not cover all sides of the 3D geometry, the camera is a
bit limited in what it can shoot, so this approach is referred to as
2.5D. More extensive mapping can cover all surfaces, but then the scene
becomes less a matte painting and more a fully rendered, immersive 3D
environment.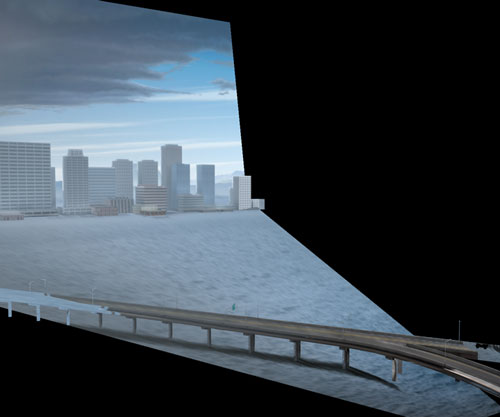
Conclusion
Obviously, there is much more to say on this subject and this had
been just a brief introduction. Matte painting is closely tied into
other special effects areas like compositing, texturing, and 3D
animation
http://psd.tutsplus.com/articles/techniques/basic-principles-of-digital-matte-painting/
Digital Matte Painting is a huge creative field that can add wonder and
excitement to static film shots. Learn about digital matte painting
principles, like set extension, camera mapping, as well as professional
tips that matte painters employ
Introduction
Ever wonder how those incredible scenes of panoramic vistas,
impossible futuristic cities, or fantastic alien worlds come to life?
It’s all through the magic of matte painting. If only I had a dollar
(hey, inflation!) for every time someone responded, “Map painting?” But
you know what I’m talking about, right? If you don’t, a brief history
lesson is in order.
Ages ago, extremely talented artists painted these realistic scenes
on large sheets of glass. It really is a lost art nowadays. The painting
included blank areas that would get filled in with live action. The
filmed segments were optically composited with the painting for the
final result. A matte is a solid shape that is used to block out areas
of the film frame so that no image gets exposed there. A simple matte
shot would require a shot of the painting with a matte to block out the
live area, the film sequence with a matte to block out everything but
the live area, and a final piece of film for everything to be exposed
onto.
The Digital Revolution
With the invention of Adobe Photoshop, things began to change. What
used to require laborious work in a film studio with several lengths of
film and expensive, specialized cameras can now be done on a home
computer with easily available software. No matter how you approach it,
Photoshop has become an integral part of the process. The simplest matte
paintings are ones in which the camera is stationary throughout the
entire sequence. This is called a locked-off shot. Creating a matte
painting for this kind of shot can be fairly easy. Only one frame, or
plate, of the footage is needed. It can be opened in Photoshop and the
new areas painted right on top.
The Right Size
The first thing to decide is what size to make your painting. In
Photoshop, set your Image Size in pixel increments. Don’t worry about
inches or Resolution; they don’t matter here. All you care about is
pixel width and height. How big your painting’s dimensions should be
depends on its intended use. DVD is 720×480 pixels. HD is 1920×1080
pixels. Film sizes start at 2048×1080 (commonly called 2K) and can go up
from there to 3K, 4K, and beyond.
For many special effects studios, the exact resolution they work in
is proprietary. So the size to make your image depends on what medium
you are doing a matte painting for. A little trick employed by most
professional matte painters is to work at 150 or 200% of the final size.
This is because imperfections and painted artifacts get minimized when
the final image is sized down. This technique can produce detail that is
hard to paint by hand and can also get rid of some traces of hand
painting. So, if you are doing a matte painting for HD footage, you may
want to work in 2880×1620 or even 3840×2160 pixels.
You can see how easy it is to end up with huge files, so a fast
processor and lots of RAM are essential. Also, remember to work in RGB
mode, which has a larger color gamut than CMYK. Photoshop works natively
in RGB; some of its filters and functions won’t work in CMYK. Some jobs
may even require working in 16-bit color mode for smoother transitions
and gradients.
Set Extension
A common application of matte painting is set extension. This is
where only the background immediately behind the action is filmed and
for practical, budgetary, or other reasons, the rest must be painted in
later. The simplest set extensions are on locked off shots. In working
on this kind of shot, the first thing to do is determine the perspective
of the scene by finding its vanishing points. This is easily
accomplished with the line tool in Photoshop. Use bright colors so that
the lines stand out from the background. A good tip here is to use
vector lines on shape layers so that they can easily be repositioned
Filling in the nonexistent set is mainly done with the brush and
clone tools. Pick colors directly from the source plate so that your new
painting will match. But a close inspection reveals that hand-painted
areas lack the photographic grain found in the plate. Since the grain in
the footage animates, it is usually added back in during compositing,
but the matte painter may need to provide an alpha channel of the new
painted area to the compositor.
If you need to add the grain in for a still or to see how closely
your painting matches the plate, Photoshop’s Grain, Film Grain, and Add
Noise filters are very helpful. The Grain filter is perhaps the most
useful choice, because it has different types you can choose to best
match your photo. Apply the grain to a layer filled with 50% gray and
set to Overlay blending mode. The gray becomes transparent and all you
will see on that layer is the grain, which you can take down in opacity
to match your plate. Usually, only a small percentage is needed. This
grain layer’s opacity is 8% and it matches the plate seamlessly.
Camera Mapping
Thanks to advances in 3D animation, matte paintings no longer need to
be static shots. Simple geometry can be built in a 3D environment that
matches the scene. The matte paintings are then projected onto those
shapes, similar to how slides are projected onto a screen. The painting
is no longer a flat, 2D image, but has some dimension to it. This
technique is known as camera mapping and it allows a virtual camera to
be animated in 3D space around the matte painting.
The difference in depth allows for parallax, where objects closer to
the camera move more than objects farther away. Because the projected
paintings may not cover all sides of the 3D geometry, the camera is a
bit limited in what it can shoot, so this approach is referred to as
2.5D. More extensive mapping can cover all surfaces, but then the scene
becomes less a matte painting and more a fully rendered, immersive 3D
environment.
Conclusion
Obviously, there is much more to say on this subject and this had
been just a brief introduction. Matte painting is closely tied into
other special effects areas like compositing, texturing, and 3D
animation
http://psd.tutsplus.com/articles/techniques/basic-principles-of-digital-matte-painting/

mega- الجنس :

عدد المساهمات : 120
النقاط : 48998
التقييم : 13
تاريخ التسجيل : 2011-01-14
» 33 Digital Painting Tutorials
» Pencil Sketch to Smooth Digital Shading
» Basic Concepts in Painting and Sculpture
» Self Defense Tips & Techniques for Women-video
» المكتبات الرقمية Digital Libraries
» Pencil Sketch to Smooth Digital Shading
» Basic Concepts in Painting and Sculpture
» Self Defense Tips & Techniques for Women-video
» المكتبات الرقمية Digital Libraries
Page 1 of 1
Permissions in this forum:
You cannot reply to topics in this forum|
|
|