Become a Master of the Pen Tool in Under 30 Minutes
Page 1 of 1
 Become a Master of the Pen Tool in Under 30 Minutes
Become a Master of the Pen Tool in Under 30 Minutes
http://psd.fanextra.com/tutorials/become-a-master-of-the-pen-tool-in-under-30-minutes/
Final Image
This is the final image that we’ll be creating.

Step 1
Download this image http://www.sxc.hu/photo/1104824
Don’t think you’ve already made it as we will be tracing over the image!
Open the image in Photoshop and re-size it to what you want. I re-sized mine to 1800 px by 2546 px.
I lowered the opacity of the penguin image to 50% as it’s much easier to see your paths and curves your creating.
To do this, simply duplicate the layer, delete the bottom, original layer and then set the opacity to 50%.
Step 2
Create a new layer, name it ‘Body’ and select the Pen Tool (the shortcut for the Pen Tool is ‘P’).

Make sure that Paths are selected.

Step 3
To start with we will work on the outline of the body.
Left click on the very top of the head. A small square box will show. This is called an anchor point. It’s the beginning of the path.

For larger areas I like to create larger lines as I feel it creates a smoother curve rather than creating lots of anchor points, but, if you want, you can create smaller lines and use more anchor points. Try both methods and see which works best for you.
When you come to do smaller and more detailed areas, e.g. the foot, you will have to create smaller lines and curves.


Step 4
Click (and hold) on the start of the arm.

Now drag your mouse down and you will notice that the line will bend.
Drag and release your mouse button when the line curves round and fits round the edge of the head.

If a line isn’t as good as what you want it to be, no problem, the Pen Tool is very forgiving.
One option is to delete the last anchor point you made. To do this, press Delete. This will delete the last anchor point. After you’ve deleted an anchor point you must remember to click on the last anchor point you made or else it will create a new sub-path.


You can also edit the angle of the line by choosing the convert point tool.
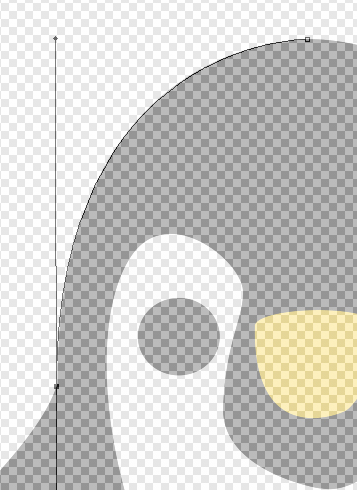
When you created the curve you probably noticed these two lines appear.
These are called guide/direction lines. They control the angle and
length of the curve.

With the Pen Tool still selected, hold down the key ‘Alt’
(this is the shortcut key for the Convert Point Tool) and hover over
the top direction line. (you’ll notice that your cursor won’t change
until you hover over the ends of a direction line or an anchor point).
Now if you click and hold the top direction line you will be able to edit the curve and make any fine tuning to it.
The last way of editing paths is holding down the ‘Ctrl’ key. This enables you to move anchor points and direction lines and again make any edits to your lines and curves.
If you want, play about with a few lines to get to grip with what you can do.
Step 5
The bottom direction line will be long and like this, if you have not edited it.

If you try to continue and click on the outline of the arm with the Pen Tool, the line will not go where you want it to!
This is because the direction line is large and creates a large curve
(basically a long direction line = a long curve, a short direction line =
a short curve!).
Hold down the ‘Alt’ key, click and drag the bottom end of the direction line upwards so it sits reasonably close
to the anchor point and follows the direction of the arm.


Now you should be able to draw around the arm using these different methods to edit the line/curves.
Here’s what mine looks like.
http://psd.fanextra.com/tutorials/become-a-master-of-the-pen-tool-in-under-30-minutes/
Final Image
This is the final image that we’ll be creating.

Step 1
Download this image http://www.sxc.hu/photo/1104824
Don’t think you’ve already made it as we will be tracing over the image!
Open the image in Photoshop and re-size it to what you want. I re-sized mine to 1800 px by 2546 px.
I lowered the opacity of the penguin image to 50% as it’s much easier to see your paths and curves your creating.
To do this, simply duplicate the layer, delete the bottom, original layer and then set the opacity to 50%.
Step 2
Create a new layer, name it ‘Body’ and select the Pen Tool (the shortcut for the Pen Tool is ‘P’).

Make sure that Paths are selected.

Step 3
To start with we will work on the outline of the body.
Left click on the very top of the head. A small square box will show. This is called an anchor point. It’s the beginning of the path.

For larger areas I like to create larger lines as I feel it creates a smoother curve rather than creating lots of anchor points, but, if you want, you can create smaller lines and use more anchor points. Try both methods and see which works best for you.
When you come to do smaller and more detailed areas, e.g. the foot, you will have to create smaller lines and curves.


Step 4
Click (and hold) on the start of the arm.

Now drag your mouse down and you will notice that the line will bend.
Drag and release your mouse button when the line curves round and fits round the edge of the head.

If a line isn’t as good as what you want it to be, no problem, the Pen Tool is very forgiving.
One option is to delete the last anchor point you made. To do this, press Delete. This will delete the last anchor point. After you’ve deleted an anchor point you must remember to click on the last anchor point you made or else it will create a new sub-path.


You can also edit the angle of the line by choosing the convert point tool.
When you created the curve you probably noticed these two lines appear.
These are called guide/direction lines. They control the angle and
length of the curve.

With the Pen Tool still selected, hold down the key ‘Alt’
(this is the shortcut key for the Convert Point Tool) and hover over
the top direction line. (you’ll notice that your cursor won’t change
until you hover over the ends of a direction line or an anchor point).
Now if you click and hold the top direction line you will be able to edit the curve and make any fine tuning to it.
The last way of editing paths is holding down the ‘Ctrl’ key. This enables you to move anchor points and direction lines and again make any edits to your lines and curves.
If you want, play about with a few lines to get to grip with what you can do.
Step 5
The bottom direction line will be long and like this, if you have not edited it.

If you try to continue and click on the outline of the arm with the Pen Tool, the line will not go where you want it to!
This is because the direction line is large and creates a large curve
(basically a long direction line = a long curve, a short direction line =
a short curve!).
Hold down the ‘Alt’ key, click and drag the bottom end of the direction line upwards so it sits reasonably close
to the anchor point and follows the direction of the arm.


Now you should be able to draw around the arm using these different methods to edit the line/curves.
Here’s what mine looks like.

discovery- الجنس :

عدد المساهمات : 1002
النقاط : 56437
التقييم : 12
تاريخ التسجيل : 2010-04-28
 Re: Become a Master of the Pen Tool in Under 30 Minutes
Following the information in Step 3 to 5 you should now be able to draw around the whole body.
Remember,
Keep hold of your mouse and drag in a direction to curve the line
Long direction lines = long curves
Short direction lines = short curves
If you delete an anchor point, click on the last one you created
Use the convert point tool to shorten/lengthen the direction lines
Zoom into the areas that are quite detailed and need small curves and lines
It does not matter if your lines are not perfectly traced around the edges
Take your time!
Step 6
As you finish the right arm you’ll be able to click on the 1st anchor point you made. This will close and finish the path.
Your image should look similar to this.

Now change your foreground colour to black.

Now right click (with the Pen Tool still selected) and this box will appear.

Click on ‘Fill Path’ and use these settings.

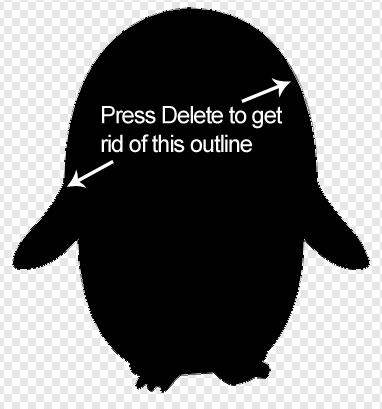
The outline of the Pen Tool will be around the body so press delete to get rid of this.

Your image should now look like this.

Step 7
Click the small eye symbol next to the Body layer to hide that layer.

Create a new layer above the layer ‘Body’ and name it ‘Stomach’. Use the Pen Tool to draw around the outline of the white part of the body.

When you’ve finished and closed the path, set the foreground colour to white, right click and choose Fill Path. Click delete to get rid of the pen outline.
Now your image should look like this with the body layer showing.

Step 8
Create a new layer on top and name it ‘Left Eye’. Hide the other layers accept the original penguin image.
As the eye is a circle you can either create it with the ellipse tool,

or,
draw around the left eye with the Pen Tool and fill it with the colour Black.
After you’ve finished the left eye, duplicate the layer (Ctrl &
J/Apple Option Key & J) and move it over to the other eye. Name this
layer, ‘Right Eye’.

Here’s how the image is looking with all the layers visible.

Step 9
Create another layer on top and name it, ‘Beak’. Again hide the other layers so you can trace around the beak.
Use the Pen Tool to draw around the beak and set the foreground colour to #fbdf26. Fill the path and then press delete to get rid of the pen outline.

Step 10
Delete the background layer (the original penguin image) and make all
your layers visible. I added a layer filled with the colour white at
the bottom and cropped the image so the penguin was sat neatly in the
centre.
Here’s the final image that we’ve created. I hope you’ve enjoyed the tutorial.

Remember,
Keep hold of your mouse and drag in a direction to curve the line
Long direction lines = long curves
Short direction lines = short curves
If you delete an anchor point, click on the last one you created
Use the convert point tool to shorten/lengthen the direction lines
Zoom into the areas that are quite detailed and need small curves and lines
It does not matter if your lines are not perfectly traced around the edges
Take your time!
Step 6
As you finish the right arm you’ll be able to click on the 1st anchor point you made. This will close and finish the path.
Your image should look similar to this.

Now change your foreground colour to black.

Now right click (with the Pen Tool still selected) and this box will appear.

Click on ‘Fill Path’ and use these settings.

The outline of the Pen Tool will be around the body so press delete to get rid of this.

Your image should now look like this.

Step 7
Click the small eye symbol next to the Body layer to hide that layer.

Create a new layer above the layer ‘Body’ and name it ‘Stomach’. Use the Pen Tool to draw around the outline of the white part of the body.

When you’ve finished and closed the path, set the foreground colour to white, right click and choose Fill Path. Click delete to get rid of the pen outline.
Now your image should look like this with the body layer showing.

Step 8
Create a new layer on top and name it ‘Left Eye’. Hide the other layers accept the original penguin image.
As the eye is a circle you can either create it with the ellipse tool,

or,
draw around the left eye with the Pen Tool and fill it with the colour Black.
After you’ve finished the left eye, duplicate the layer (Ctrl &
J/Apple Option Key & J) and move it over to the other eye. Name this
layer, ‘Right Eye’.

Here’s how the image is looking with all the layers visible.

Step 9
Create another layer on top and name it, ‘Beak’. Again hide the other layers so you can trace around the beak.
Use the Pen Tool to draw around the beak and set the foreground colour to #fbdf26. Fill the path and then press delete to get rid of the pen outline.

Step 10
Delete the background layer (the original penguin image) and make all
your layers visible. I added a layer filled with the colour white at
the bottom and cropped the image so the penguin was sat neatly in the
centre.
Here’s the final image that we’ve created. I hope you’ve enjoyed the tutorial.


discovery- الجنس :

عدد المساهمات : 1002
النقاط : 56437
التقييم : 12
تاريخ التسجيل : 2010-04-28

discovery- الجنس :

عدد المساهمات : 1002
النقاط : 56437
التقييم : 12
تاريخ التسجيل : 2010-04-28
 Similar topics
» Two Simple Techniques To Help You Master the Pen Tool
» Using pen tool
» THE PEN TOOL illustrator
» Make a Realistic Wine Glass in 10 Minutes using 3D Studio Max
» Style Master 4.6
» Using pen tool
» THE PEN TOOL illustrator
» Make a Realistic Wine Glass in 10 Minutes using 3D Studio Max
» Style Master 4.6
Page 1 of 1
Permissions in this forum:
You cannot reply to topics in this forum Home
Home