Using pen tool
Page 1 of 1
 Using pen tool
Using pen tool
http://www.techtut.com/Tutorial/Photoshop/9-Using-Pen-Tool-in-Photoshop.html
This is going to be a tutorial on how to use the pen tool. The pen tool
is pretty much the only way to really draw in Photoshop and once you
know it, it becomes a very powerful tool. Do not try to learn this
without the aid of a tutorial as you will get very frustrated :)

Enlarge Image
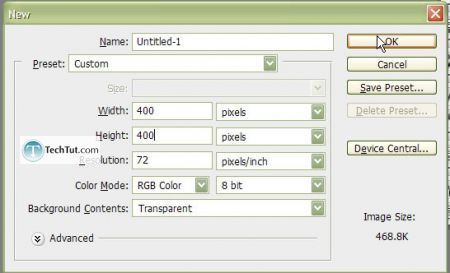
Step 1. Create a new document. File > New…
Enlarge Image
400px by 400px. 72 resolution per inch, transparent background, RGB 8 bit.
Step 2. Straight Lines
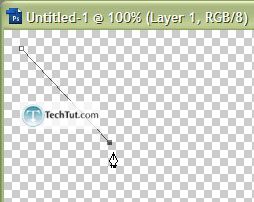
Get out your pen tool. Click once anywhere on the Photoshop document
and then click again at any point on the document. As you can see, this
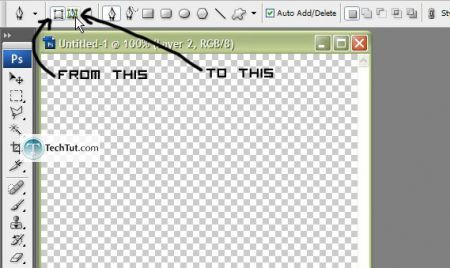
creates a straight line. Also, now is a good point to change the way
the pen tool is preset – instead of creating shapes with the pen tool,
we want to create paths. Follow the instructions on the second image
below.
Enlarge Image
Enlarge Image
Step 3. Deleting Paths
“Ctrl” + “Z”, then “Ctrl” + “Alt” + “Z”, in order to undo and then undo
once more. If you were to press “Ctrl” + “Z” the second time too, it
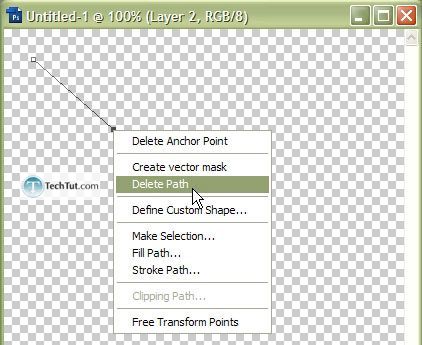
would simply redo. To get rid of the path, you could have also just
right-clicked (with the pen tool) and then selected “Delete Path”.
Enlarge Image
Step 4. Curvy Lines
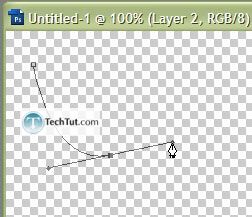
Click once anywhere. On this second click (anywhere else), don’t
actually click then let go; click then hold and move the mouse now. The
line will curve, get bigger, etc. Play around with it for a moment.
Enlarge Image
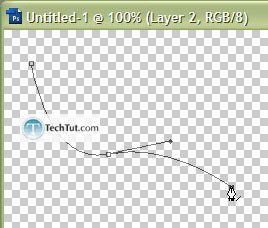
Once you have decided on a line and have stopped playing around with it,
if you click again, you’ll notice that it won’t be a straight line.
This second line restricts you control over it.
Enlarge Image
Step 5. Ultimatum
Finally, we have come to the time when you are ready to learn the
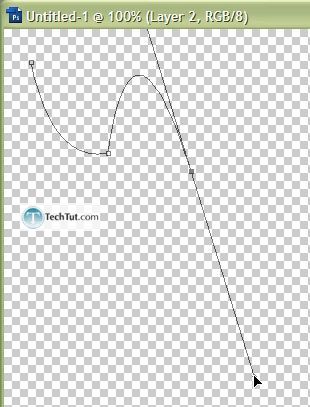
ultimate trick. First make a curvy line, then remember how we had
trouble making a straight line or a specific curve? Well now before
making that second curvy/straight line, while holding down “Alt”, click
on the second point.

Enlarge Image

Enlarge Image
Now when you go and try to create your second straight/curvy line, you have complete control. Muahahaha….erhm…
Enlarge Image
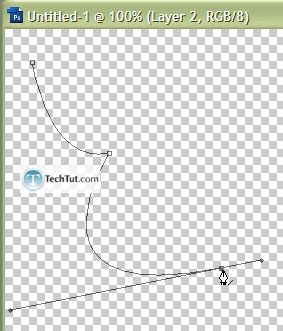
Step 6. OH NO! I made a mistake
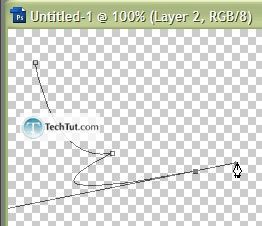
Not to worry, there is an easy way to change any mistake you have made.
In fact, you can even move the points. When you want to change the
curve angle, just hold down “Ctrl” and then click on the square at the
end. See the image below:
Enlarge Image
To move the points, simply hold down “Ctrl” and then drag the points to wherever you want them.
Enlarge Image
http://www.techtut.com/Tutorial/Photoshop/9-Using-Pen-Tool-in-Photoshop.html
This is going to be a tutorial on how to use the pen tool. The pen tool
is pretty much the only way to really draw in Photoshop and once you
know it, it becomes a very powerful tool. Do not try to learn this
without the aid of a tutorial as you will get very frustrated :)

Enlarge Image
Step 1. Create a new document. File > New…

Enlarge Image
400px by 400px. 72 resolution per inch, transparent background, RGB 8 bit.
Step 2. Straight Lines
Get out your pen tool. Click once anywhere on the Photoshop document
and then click again at any point on the document. As you can see, this
creates a straight line. Also, now is a good point to change the way
the pen tool is preset – instead of creating shapes with the pen tool,
we want to create paths. Follow the instructions on the second image
below.

Enlarge Image

Enlarge Image
Step 3. Deleting Paths
“Ctrl” + “Z”, then “Ctrl” + “Alt” + “Z”, in order to undo and then undo
once more. If you were to press “Ctrl” + “Z” the second time too, it
would simply redo. To get rid of the path, you could have also just
right-clicked (with the pen tool) and then selected “Delete Path”.

Enlarge Image
Step 4. Curvy Lines
Click once anywhere. On this second click (anywhere else), don’t
actually click then let go; click then hold and move the mouse now. The
line will curve, get bigger, etc. Play around with it for a moment.

Enlarge Image
Once you have decided on a line and have stopped playing around with it,
if you click again, you’ll notice that it won’t be a straight line.
This second line restricts you control over it.

Enlarge Image
Step 5. Ultimatum
Finally, we have come to the time when you are ready to learn the
ultimate trick. First make a curvy line, then remember how we had
trouble making a straight line or a specific curve? Well now before
making that second curvy/straight line, while holding down “Alt”, click
on the second point.

Enlarge Image

Enlarge Image
Now when you go and try to create your second straight/curvy line, you have complete control. Muahahaha….erhm…

Enlarge Image
Step 6. OH NO! I made a mistake
Not to worry, there is an easy way to change any mistake you have made.
In fact, you can even move the points. When you want to change the
curve angle, just hold down “Ctrl” and then click on the square at the
end. See the image below:

Enlarge Image
To move the points, simply hold down “Ctrl” and then drag the points to wherever you want them.

Enlarge Image

discovery- الجنس :

عدد المساهمات : 1002
النقاط : 56397
التقييم : 12
تاريخ التسجيل : 2010-04-28
 Similar topics
» Pen Tool Tutorial Recommended for Beginner
» THE PEN TOOL illustrator
» Using the pen tool to extract or make selection
» Pent Tool cheat-sheet
» Become a Master of the Pen Tool in Under 30 Minutes
» THE PEN TOOL illustrator
» Using the pen tool to extract or make selection
» Pent Tool cheat-sheet
» Become a Master of the Pen Tool in Under 30 Minutes
Page 1 of 1
Permissions in this forum:
You cannot reply to topics in this forum Home
Home