 Search
Photoshop Masking & Montage Tutorial — Using Masks To Improve Landscape Images
Page 1 of 1

Photoshop Masking & Montage Tutorial — Using Masks To Improve Landscape Images
![]() by discovery Sun Apr 01, 2012 11:55 pm
by discovery Sun Apr 01, 2012 11:55 pm
Photoshop Masking & Montage Tutorial — Using Masks To Improve Landscape Images
http://www.photoshopsupport.com/tutorials/masking-and-montage/photoshop-masks.html
n essential ingredient of any memorable landscape image. Unfortunately
it is not something the photographer can control unless we have
limitless time and patience. The commercial photographer is often
required to deliver the goods on a day that suits the client rather than
the photographer and weather forecast.
In these instances it is worth building a personal stock library
of impressive skies that can be utilized to turn ordinary images with
bland skies into impressive ones. The digital compact set to a low ISO
is ideal for capturing these fleeting moments. The most useful skies to
collect are the ones that include detail close to the horizon line, i.e.
captured without interference from busy urban skylines, such as can be
found at the beach or in the desert.
A stock library of skies is included on the DVD of the new Photoshop CS3 Essential Skills
book (published by Focal Press) to help you start, or add to, your own
collection. In this project we explore how a sky can be adapted to fit
the landscape so the montage is not immediately obvious.
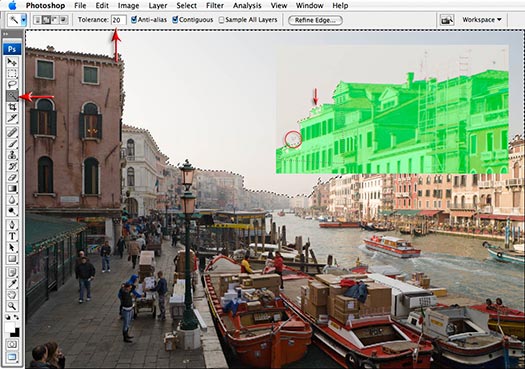
Step 1
Select the Magic Wand Tool from the Tools
palette and set the tolerance to 20 in the Options bar. Select the Add
to Selection icon in the Options bar or hold down the Shift key as you
click multiple times to select all of the sky. Zoom in to 100% or
‘Actual Pixels’ and select Quick Mask mode from the Tools palette.
Use the Polygonal Lasso Tool to select the tops of the buildings
that were not included in the mask because the Magic Wand may have
become over zealous. Fill this selection with black (if Black is the
foreground color in the Tools palette you may use the keyboard shortcut
Alt/Option+backspace/delete). Exit Quick mask Mode when this work is
finished (keyboard shortcut is to press the letter Q).
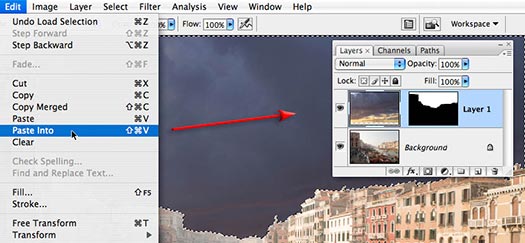
Step 2
Open the Sky image used in this project and
from the Select menu choose All. From the Edit menu choose Copy. Return
to the Venice image and from the Edit menu choose Paste Into. Don’t be
alarmed at how bad it looks at the moment, we have several more steps to
go before things start to look OK. For the moment we must be content
that the sky was captured at a similar time of day to the Venice image
and the direction of light is also similar. From the Select menu choose
Deselect.
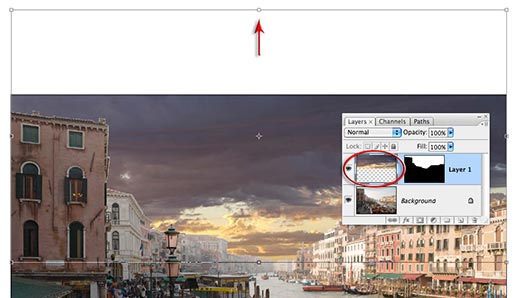
Step 3
Make sure the Image rather than the mask is the
active component of the layer and then choose Free Transform from the
Edit menu (Ctrl/Command+T). Click and drag inside the Transform bounding
box to raise the sky into position. Click and drag on the top-center
handle to further enhance the location and shape of the sky to fit the
host image. Press the Enter/Return key to commit the transformation.
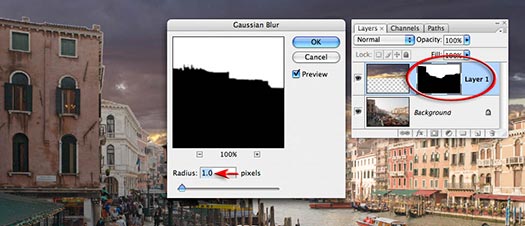
Step 4
Click on the layer mask to make it active and
then go to Filter > Blur > Gaussian Blur. Choose a 1-pixel Radius
in the Gaussian Blur dialog box and select OK. Go to Filter > Other
> Maximum and enter a Radius of 2-pixels. This should be sufficient
to remove any light halo from around the edges of the buildings. Select
OK to apply these changes to the mask.

Step 5
Hold down the Alt/Option key and select a
Curves adjustment layer from the Create new fill or adjustment layer
icon in the Layers palette. In the New Layer dialog box check the Use
Previous Layer to Create Clipping Mask option. Select OK to open the
Curves dialog box. Create a curve that renders both the highlights and
midtones of the sky very bright so that they match the tones of the
distant buildings. Skies that have been captured in less humid
conditions will always require this adjustment if they are look at home
in a location where there is reduced contrast together with lighter
tones in the distant subject matter. Select OK to apply the changes.
http://www.photoshopsupport.com/tutorials/masking-and-montage/photoshop-masks.html
n essential ingredient of any memorable landscape image. Unfortunately
it is not something the photographer can control unless we have
limitless time and patience. The commercial photographer is often
required to deliver the goods on a day that suits the client rather than
the photographer and weather forecast.
In these instances it is worth building a personal stock library
of impressive skies that can be utilized to turn ordinary images with
bland skies into impressive ones. The digital compact set to a low ISO
is ideal for capturing these fleeting moments. The most useful skies to
collect are the ones that include detail close to the horizon line, i.e.
captured without interference from busy urban skylines, such as can be
found at the beach or in the desert.
A stock library of skies is included on the DVD of the new Photoshop CS3 Essential Skills
book (published by Focal Press) to help you start, or add to, your own
collection. In this project we explore how a sky can be adapted to fit
the landscape so the montage is not immediately obvious.
Step 1
Select the Magic Wand Tool from the Tools
palette and set the tolerance to 20 in the Options bar. Select the Add
to Selection icon in the Options bar or hold down the Shift key as you
click multiple times to select all of the sky. Zoom in to 100% or
‘Actual Pixels’ and select Quick Mask mode from the Tools palette.
Use the Polygonal Lasso Tool to select the tops of the buildings
that were not included in the mask because the Magic Wand may have
become over zealous. Fill this selection with black (if Black is the
foreground color in the Tools palette you may use the keyboard shortcut
Alt/Option+backspace/delete). Exit Quick mask Mode when this work is
finished (keyboard shortcut is to press the letter Q).
Step 2
Open the Sky image used in this project and
from the Select menu choose All. From the Edit menu choose Copy. Return
to the Venice image and from the Edit menu choose Paste Into. Don’t be
alarmed at how bad it looks at the moment, we have several more steps to
go before things start to look OK. For the moment we must be content
that the sky was captured at a similar time of day to the Venice image
and the direction of light is also similar. From the Select menu choose
Deselect.
Step 3
Make sure the Image rather than the mask is the
active component of the layer and then choose Free Transform from the
Edit menu (Ctrl/Command+T). Click and drag inside the Transform bounding
box to raise the sky into position. Click and drag on the top-center
handle to further enhance the location and shape of the sky to fit the
host image. Press the Enter/Return key to commit the transformation.
Step 4
Click on the layer mask to make it active and
then go to Filter > Blur > Gaussian Blur. Choose a 1-pixel Radius
in the Gaussian Blur dialog box and select OK. Go to Filter > Other
> Maximum and enter a Radius of 2-pixels. This should be sufficient
to remove any light halo from around the edges of the buildings. Select
OK to apply these changes to the mask.
Step 5
Hold down the Alt/Option key and select a
Curves adjustment layer from the Create new fill or adjustment layer
icon in the Layers palette. In the New Layer dialog box check the Use
Previous Layer to Create Clipping Mask option. Select OK to open the
Curves dialog box. Create a curve that renders both the highlights and
midtones of the sky very bright so that they match the tones of the
distant buildings. Skies that have been captured in less humid
conditions will always require this adjustment if they are look at home
in a location where there is reduced contrast together with lighter
tones in the distant subject matter. Select OK to apply the changes.

discovery- الجنس :

عدد المساهمات : 1002
النقاط : 56397
التقييم : 12
تاريخ التسجيل : 2010-04-28
Re: Photoshop Masking & Montage Tutorial — Using Masks To Improve Landscape Images
![]() by discovery Sun Apr 01, 2012 11:55 pm
by discovery Sun Apr 01, 2012 11:55 pm
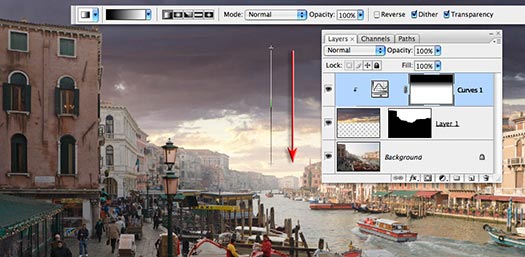
Step 6
Select the Gradient Tool from the Tools
palette. In the Options bar choose the Black, White and Linear gradient
options and an Opacity setting of 100%. Click and drag a gradient from
the top of the image to a position just above the horizon line. Hold
down the Shift key to constrain the gradient. This will give the sky
depth and ensure the sky retains it drama above the buildings in the
foreground.
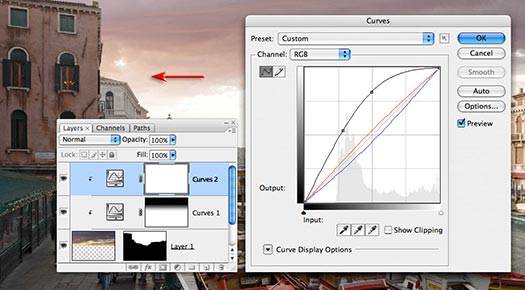
Step 7
Create a second Curves adjustment layer by
holding down the Alt/Option key and adding this layer to the Clipping
mask. The purpose of this second adjustment layer is to increase the
intensity of the light on the left side of the image. This will help
establish the light source that is bathing the buildings on the right
side of the image in a warm afternoon glow and help establish a
realistic effect.
Raise the overall brightness using the RGB channel and increase
the warmth using the individual Red and Blue channels. Observe the
effect above the foreground buildings on the left side of the image.
When you have achieved a warm glow select OK.
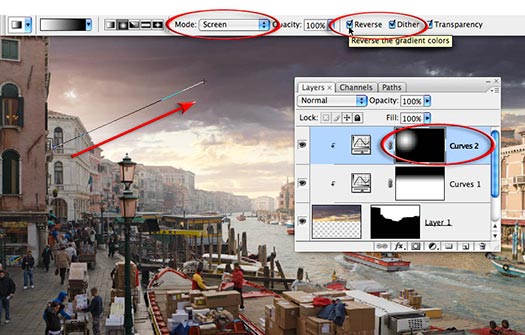
Step 8
Fill the layer mask with Black (Edit > Fill
> Black). Select the Gradient Tool from the Tools palette. Select the
Black, White and Radial options. Set the mode to Screen and select the
Reverse checkbox in the Options bar. Drag a short gradient from behind
the buildings on the left side of the image to the top-center of the
image.
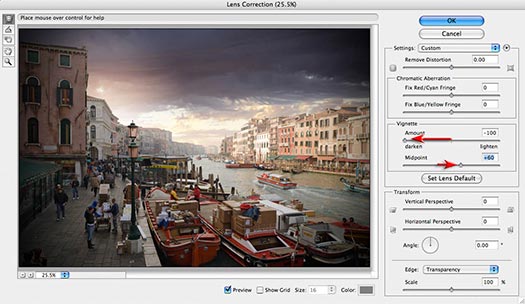
Step 9
Select the top layer in the layers palette and
then stamp the visible layers to a new layer (Select > Select all,
Edit > Copy Merged and Edit > Paste). Go to Filter > Distort
> Lens Correction. Go to the Vignette section of the dialog box and
lower the Amount slider to -100. Raise the Midpoint slider slightly so
that the vignette does not encroach too heavily on the buildings on the
extreme right-hand side of the image.
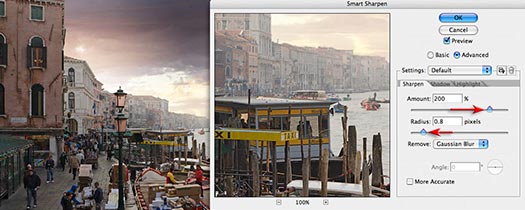
Select OK to apply these changes. Go to Filter > Sharpen >
Smart Sharpen. Be generous with the amount and keep the radius small
(under 1 pixel). The project is now complete and the scene carries all
the mood of an old Venetian painting courtesy of a dramatic sky.
Adapted from "Photoshop CS3 Essential Skills" by Mark Galer and Philip Andrews © 2007. Used with permission. Learn more tips and tricks from Photoshop expert Mark Galer.
Select the Gradient Tool from the Tools
palette. In the Options bar choose the Black, White and Linear gradient
options and an Opacity setting of 100%. Click and drag a gradient from
the top of the image to a position just above the horizon line. Hold
down the Shift key to constrain the gradient. This will give the sky
depth and ensure the sky retains it drama above the buildings in the
foreground.
Step 7
Create a second Curves adjustment layer by
holding down the Alt/Option key and adding this layer to the Clipping
mask. The purpose of this second adjustment layer is to increase the
intensity of the light on the left side of the image. This will help
establish the light source that is bathing the buildings on the right
side of the image in a warm afternoon glow and help establish a
realistic effect.
Raise the overall brightness using the RGB channel and increase
the warmth using the individual Red and Blue channels. Observe the
effect above the foreground buildings on the left side of the image.
When you have achieved a warm glow select OK.
Step 8
Fill the layer mask with Black (Edit > Fill
> Black). Select the Gradient Tool from the Tools palette. Select the
Black, White and Radial options. Set the mode to Screen and select the
Reverse checkbox in the Options bar. Drag a short gradient from behind
the buildings on the left side of the image to the top-center of the
image.
Step 9
Select the top layer in the layers palette and
then stamp the visible layers to a new layer (Select > Select all,
Edit > Copy Merged and Edit > Paste). Go to Filter > Distort
> Lens Correction. Go to the Vignette section of the dialog box and
lower the Amount slider to -100. Raise the Midpoint slider slightly so
that the vignette does not encroach too heavily on the buildings on the
extreme right-hand side of the image.
Select OK to apply these changes. Go to Filter > Sharpen >
Smart Sharpen. Be generous with the amount and keep the radius small
(under 1 pixel). The project is now complete and the scene carries all
the mood of an old Venetian painting courtesy of a dramatic sky.
Adapted from "Photoshop CS3 Essential Skills" by Mark Galer and Philip Andrews © 2007. Used with permission. Learn more tips and tricks from Photoshop expert Mark Galer.
discovery- الجنس :
عدد المساهمات : 1002
النقاط : 56397
التقييم : 12
تاريخ التسجيل : 2010-04-28
» Selecting & Extracting Hair - Masking Tutorial - Extraction Tips
» A Complete Beginner’s Guide to Masking in Photoshop
» Illustrator Tutorial: How to use the pen tool to make vector images
» Book to learn Photoshop images
» Slice your layout and export images using Photoshop
» A Complete Beginner’s Guide to Masking in Photoshop
» Illustrator Tutorial: How to use the pen tool to make vector images
» Book to learn Photoshop images
» Slice your layout and export images using Photoshop
Page 1 of 1
Permissions in this forum:
You cannot reply to topics in this forum