 Search
3D Text In Clouds Tutorial
Page 1 of 1

3D Text In Clouds Tutorial
![]() by evergreen Tue May 15, 2012 9:41 am
by evergreen Tue May 15, 2012 9:41 am
Step 1
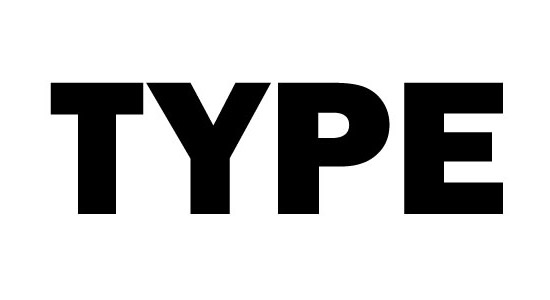
First we are going to open up a 1200x1200px document in Illustrator.
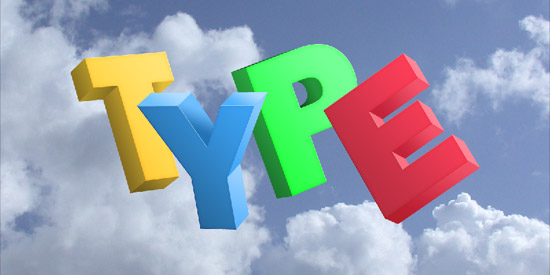
Type out the word “TYPE” in Illustrator using a bold font (I am using the font Franklin Gothic Heavy).
Now so we can adjust it we are going to go to Type>Create Outlines.
 <="" a="">
Step 2
Change the color of the text to #00A0C6. The color will be adjusted
when we get into Photoshop, but for now we will use this blue.
 <="" a="">
Step 3
Now we can start turning our 2D letters 3D. First ungroup the text by
going to Object>Ungroup. Now go into Effect>3D>Extrude &
Bevel. Adjust the text so it is something like what I have below, but
keeping mind that we are going to keep the Extrude Depth at 75pt for all
the letters as well as the perspective at 20 degrees to keep the
letters consistent.
 <="" a="">
 <="" a="">
Step 4
Now we are going to start bringing in each piece of our text into
Photoshop individually, so we want to change the 3D text into shapes.
Select all the letters and go to Object>Expand Appearance. Now
first click on the “T” and ungroup it (Object>Ungroup) so that all
the sections of the letter are separate.
Now that each piece is separated we can open up a new document in
Photoshop 1200x600px. Copy and paste each section of each section of the
“T” into a new folder (Layer>New>Layer Set) called “T”.
Copy and paste each piece of the “T” from Illustrator to Photoshop and line up the edges to make our 3D shape again.

Step 5
Continue with step 4 by copy and pasting the rest of the letters in,
into their own folders. Don’t forget to line your letters back up so it
somewhat resembles how it was laid out in Illustrator. Also try to make
letters about in the center of our document.
 <="" a="">
Step 6
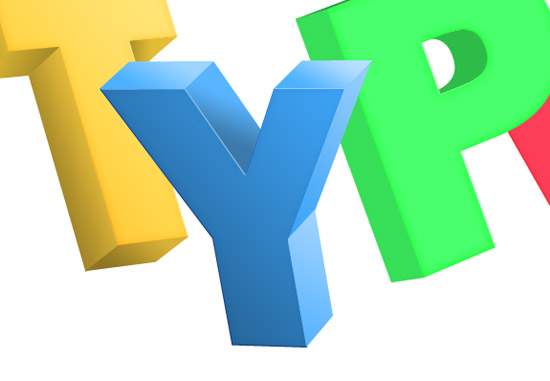
We are now going to go and change the colors of the type. Right now
the letters have the lighting that we want, with the light source coming
from the top right, so we don’t want to just fill the letters in with a
color.
To keep the darks and lights of our letters we are going to use the
Hue/Saturation (Ctrl+U). So lets start off with the face of our “T” by
changing the Hue to -145 and the Saturation to 60. Change the rest of
the sides of our text to yellow by using those same Hue and Saturation
numbers.
 <="" a="">
Step 7
Lets move on to the “Y”. We are going to change the “Y” to more of a
blue color. Open up the Hue/Saturation and change the Hue to 15 and the
Saturation to 60. Add the Hue/Saturation to the rest of the “Y”.
 <="" a="">
Step 8
For the “P” we are going to change the Hue to -60 and the Saturation to 60 to make it green.

Step 9
For the “E” we are going to change the Hue to 160 and the Saturation to 60 to make it red.
 <="" a="">
Step 10
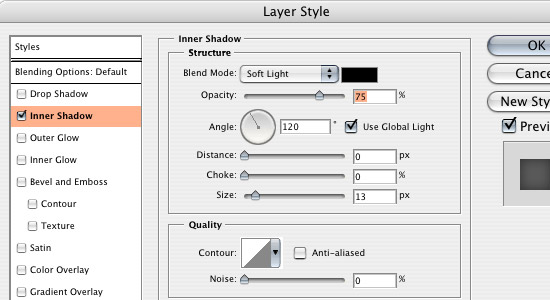
We want to give each of the letter faces a little bit of an inner
shadow, so click on the face of the “T” and go to Layer>Layer
Style>Inner Shadow.
Now you can go to the layers palette and click and drag the inner
shadow style from the face of the “T” layer onto the face layers of the
rest of the type instead of redoing the inner shadow for the rest of
them.
Step 11
As you look at the faces of the letters you may notice that some
letters like the “Y” and “E” have the inner shadow show up more than the
“T” and you can’t really see the inner shadow on the “P”.

So we want to go into each one and adjust the opacity of each letter.
The “Y” will have its opacity at 20%, the “E” at 30% and the green at
100%.

Step 12
Each letter face is also going to get a bevel added to it. Go into
Layer>Layer Style>Bevel and Emboss. This will give us more of an
edge for our letters that goes with the lighting of the document.


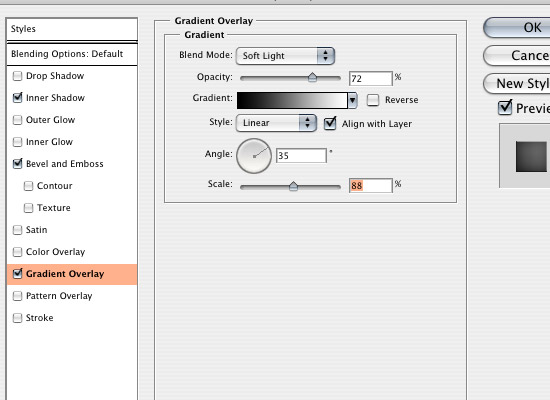
Step 13
Now we are going to start adding in the shadows and highlights,
starting with the “T”. Since our light source is coming from the top
right, we will have the darkest shadows at the bottom right sides of the
text. With that in mind, click on the face of the “T” and go to
Layer>Layer Style>Gradient Overlay to give it a slight shadow.
 <="" a="">
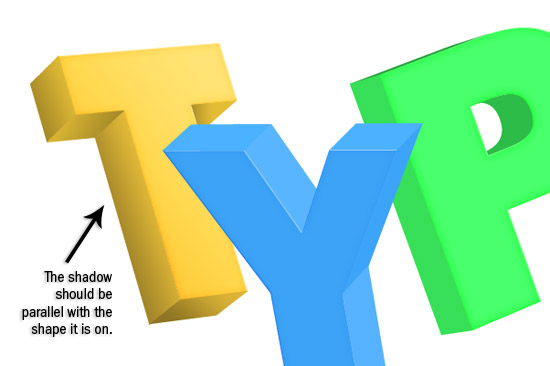
Step 14
Each side of the “T” will also get a Gradient Overlay with the black
to white gradient, except that the sides will have Multiply for a blend
mode in the options. Changing the blend mode to Multiply will make the
white disappear, and only show the black. Adjust the scale and opacity
until you get something like what I have.
Make sure you also adjust the angle of the shadow also so that it is parallel with the shape.
Step 15
We are going to be adding a Gradient Overlay on each layer of the letters to adjust the lights and darks of each one.
The “Y” will be a little bit different because the face of the text
is pointing away from the light source. To adjust the “Y” we want to add
a shadow to the face with the Gradient Overlay, like we did for the
sides of the “T”.

Step 16
Also, since the face of the “Y” is away from the light source, some
of the sides are going to get much of the light. So in those cases, we
are going to change the blend mode of our Gradient Overlay to Screen.
The Screen blend mode makes only the white show up and makes the black
disappear.
Step 17
The “P” will be similar to the “T”, with the lighter gradient on the
face because it is facing the light source. The sides of the “P” will
also be similar to the “T” with the darker edges.
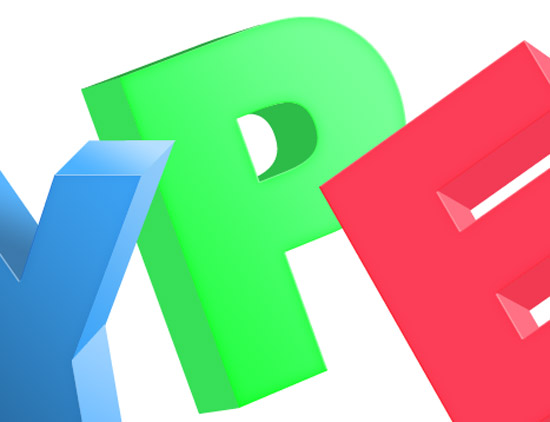
Step 18
The “E” will be similar to the “Y” because the face is away from the light source.
The sides will also be similar to the “Y”, except under the arms which we will add some shadows.

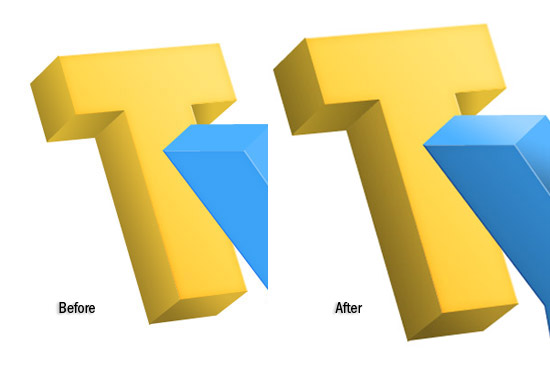
Step 19
The letters look pretty good but we want to adjust the shadows and
highlights a little more. If you look at the “T” we want to darken the
side panels to go along with the gradiend we added before.
To do this, we want to go into Layer>Layer Styles>Color
Overlay. Change the color to black and drop down the opacity for this
one to around 20%. Add this to all the panels on the left side of the
“T”, as well as the bottom.
 <="" a="">
Step 20
With the “Y” we are going to use the Color Overlay again, but this
time we are going to change the color to white, and the blend mode to
Screen at 20% for the top two panels. For the panel in the middle of the
forks we want to change the opacity to 12% and change the Gradient
Overlay’s blend mode to Linear Burn.

Step 21
The “P” will have a black Color Overlay on the side panels like the “T” did.

Step 22
For the “E”, under the arms where we made a shadow, we are going to
add a white Color Overlay like we did with the panel in between the
forks in the “Y” and also changing the Blend Mode of the Gradient
Overlay to Linear Burn.

Step 23
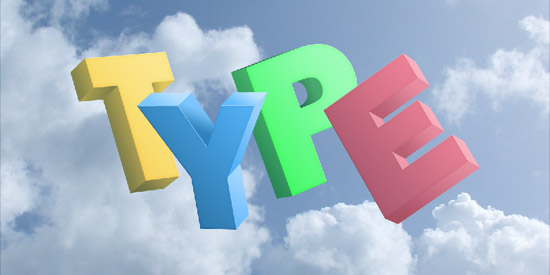
Now that we have our text, shadows and highlights, we can start adding in the rest of our image.
Lets bring in a cloud image from Image*After for our background. Move the layer just above the background layer, and adjust it until it looks good to you.
Since the light of the clouds is coming from the left, we want to
flip the image so we have a consistent light source. Go to
Edit>Transform>Flip Horizontally.
 <="" a="">
Step 24
To give more emphasis on our light source I am going to add a white
to 0% opacity Linear Gradient (G). First create a new layer
(Ctrl+Shift+N) and move it above all the rest of the layers. Click and
drag a gradient on the top left corner and drop the opacity down to 50%.

Step 25
To make our colors a little bit more consistent, with the clouds and
sky we are going to give our image a blue hue since the text is in the
sky. Go to Layer>New Adjustment Layer>Gradient Map. Pick the white
to blue gradient and click on reverse.
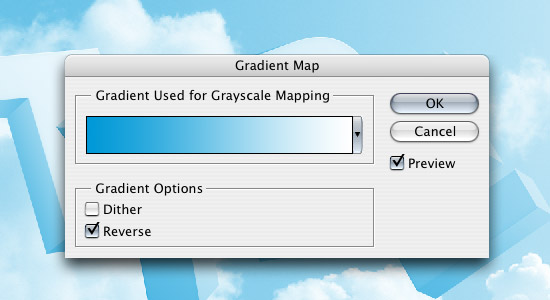
Drop the Opacity down to 20%. Make sure this layer is the very top one.
Step 26
Next we want to add a texture to the letters to give them more of a warn look. So first grab this texture from Zen Textures and open it up in Photoshop. Bring the texture into our document and shrink it down to about 30%.
Now we want to select every part of every letter. To do that we are
going to Ctrl + Shift + Click on each layer in the letter folders. Now
that everything is selected, click on the texture layer and go to
Select>Inverse, then delete. This will get rid of the texture, except
the part on the letters.
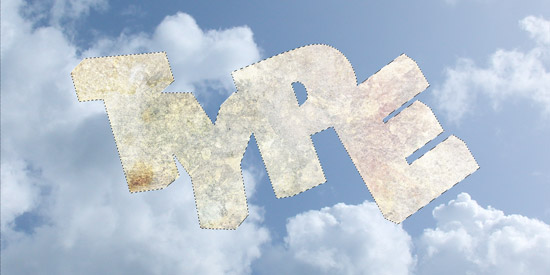
Move the texture below the white gradient and Gradient Map layers (It
should be the third one down). Change the Blend Mode to Soft Light and
change the opacity to 40%.
Step 27
Since the “Y” and “E” are above the “T” and “P” they should be
casting a shadow. To make that shadow we are going to select all the
layers on the “Y” and “E” like we did in step 26.
Create a new layer and move it below all the “Y” and “P” letter
folders (So your order should be “Y” folder, “P” folder, shadow layer,
“T” folder and “E” folder). Fill the selection with black.
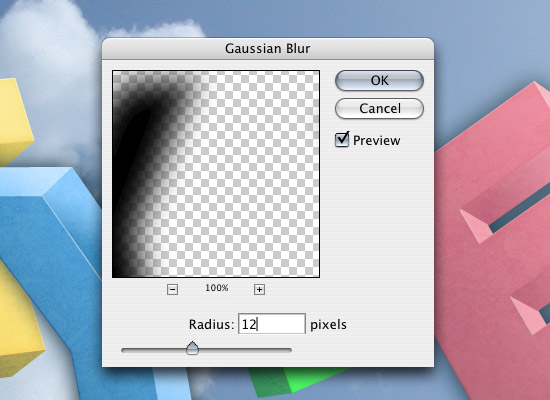
Make sure you deselect the letters (Ctrl+D) and go to Filter>Blur>Gaussian Blur. Change the Gaussian Blur to 12 px.
Now hold down shift and move one space down and one space to the left.
Step 28
Select all the layers in the “T” and “E” folders like we did in step
26, get the inverse selection (Select>Inverse) then delete. Drop the
opacity down to 50%.
Step 29
Finally what we are going to do is add some clouds in front of the letters. So go get the cloud brush
from Brusheezy. Create a new layer (Ctrl+Shift+N) and move it in above
the texture layer and below the white gradient layer. Add a cloud from
the brushes and drop the opacity to 80%.
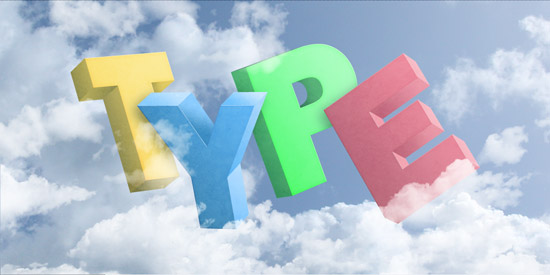
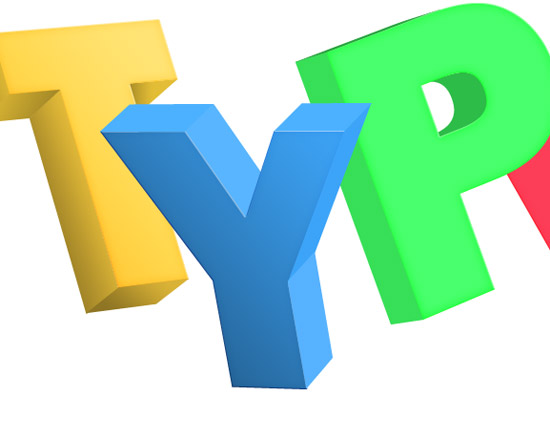
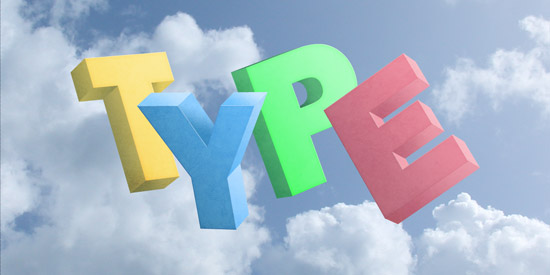
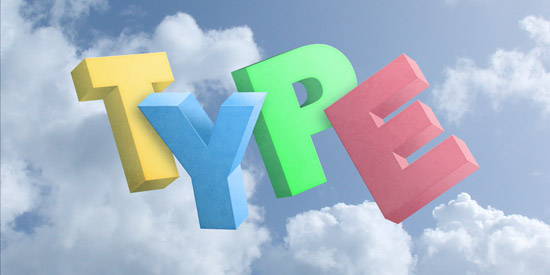
Final
There we have our text, where the shadows are editable, good for adjusting the lightness and darkness of the text.

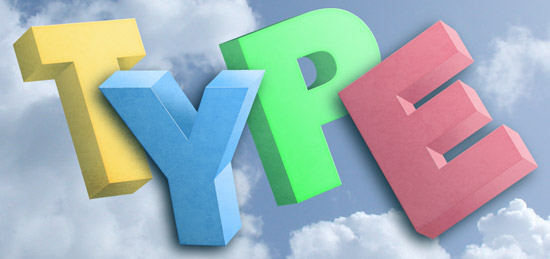
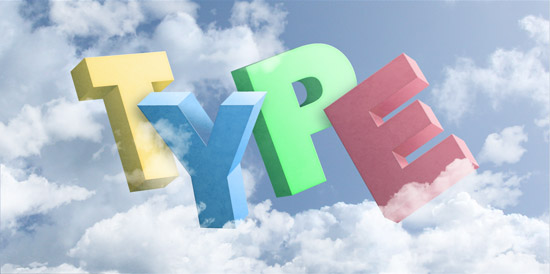
Here is an alternate version where I made more drastic shadows.
First we are going to open up a 1200x1200px document in Illustrator.
Type out the word “TYPE” in Illustrator using a bold font (I am using the font Franklin Gothic Heavy).
Now so we can adjust it we are going to go to Type>Create Outlines.
<="" a="">Step 2
Change the color of the text to #00A0C6. The color will be adjusted
when we get into Photoshop, but for now we will use this blue.
<="" a="">Step 3
Now we can start turning our 2D letters 3D. First ungroup the text by
going to Object>Ungroup. Now go into Effect>3D>Extrude &
Bevel. Adjust the text so it is something like what I have below, but
keeping mind that we are going to keep the Extrude Depth at 75pt for all
the letters as well as the perspective at 20 degrees to keep the
letters consistent.
<="" a=""><="" a="">Step 4
Now we are going to start bringing in each piece of our text into
Photoshop individually, so we want to change the 3D text into shapes.
Select all the letters and go to Object>Expand Appearance. Now
first click on the “T” and ungroup it (Object>Ungroup) so that all
the sections of the letter are separate.
Now that each piece is separated we can open up a new document in
Photoshop 1200x600px. Copy and paste each section of each section of the
“T” into a new folder (Layer>New>Layer Set) called “T”.
Copy and paste each piece of the “T” from Illustrator to Photoshop and line up the edges to make our 3D shape again.
Step 5
Continue with step 4 by copy and pasting the rest of the letters in,
into their own folders. Don’t forget to line your letters back up so it
somewhat resembles how it was laid out in Illustrator. Also try to make
letters about in the center of our document.
<="" a="">Step 6
We are now going to go and change the colors of the type. Right now
the letters have the lighting that we want, with the light source coming
from the top right, so we don’t want to just fill the letters in with a
color.
To keep the darks and lights of our letters we are going to use the
Hue/Saturation (Ctrl+U). So lets start off with the face of our “T” by
changing the Hue to -145 and the Saturation to 60. Change the rest of
the sides of our text to yellow by using those same Hue and Saturation
numbers.
<="" a="">Step 7
Lets move on to the “Y”. We are going to change the “Y” to more of a
blue color. Open up the Hue/Saturation and change the Hue to 15 and the
Saturation to 60. Add the Hue/Saturation to the rest of the “Y”.
<="" a="">Step 8
For the “P” we are going to change the Hue to -60 and the Saturation to 60 to make it green.
Step 9
For the “E” we are going to change the Hue to 160 and the Saturation to 60 to make it red.
<="" a="">Step 10
We want to give each of the letter faces a little bit of an inner
shadow, so click on the face of the “T” and go to Layer>Layer
Style>Inner Shadow.
Now you can go to the layers palette and click and drag the inner
shadow style from the face of the “T” layer onto the face layers of the
rest of the type instead of redoing the inner shadow for the rest of
them.
Step 11
As you look at the faces of the letters you may notice that some
letters like the “Y” and “E” have the inner shadow show up more than the
“T” and you can’t really see the inner shadow on the “P”.
So we want to go into each one and adjust the opacity of each letter.
The “Y” will have its opacity at 20%, the “E” at 30% and the green at
100%.
Step 12
Each letter face is also going to get a bevel added to it. Go into
Layer>Layer Style>Bevel and Emboss. This will give us more of an
edge for our letters that goes with the lighting of the document.
Step 13
Now we are going to start adding in the shadows and highlights,
starting with the “T”. Since our light source is coming from the top
right, we will have the darkest shadows at the bottom right sides of the
text. With that in mind, click on the face of the “T” and go to
Layer>Layer Style>Gradient Overlay to give it a slight shadow.
<="" a="">Step 14
Each side of the “T” will also get a Gradient Overlay with the black
to white gradient, except that the sides will have Multiply for a blend
mode in the options. Changing the blend mode to Multiply will make the
white disappear, and only show the black. Adjust the scale and opacity
until you get something like what I have.
Make sure you also adjust the angle of the shadow also so that it is parallel with the shape.
Step 15
We are going to be adding a Gradient Overlay on each layer of the letters to adjust the lights and darks of each one.
The “Y” will be a little bit different because the face of the text
is pointing away from the light source. To adjust the “Y” we want to add
a shadow to the face with the Gradient Overlay, like we did for the
sides of the “T”.
Step 16
Also, since the face of the “Y” is away from the light source, some
of the sides are going to get much of the light. So in those cases, we
are going to change the blend mode of our Gradient Overlay to Screen.
The Screen blend mode makes only the white show up and makes the black
disappear.
Step 17
The “P” will be similar to the “T”, with the lighter gradient on the
face because it is facing the light source. The sides of the “P” will
also be similar to the “T” with the darker edges.
Step 18
The “E” will be similar to the “Y” because the face is away from the light source.
The sides will also be similar to the “Y”, except under the arms which we will add some shadows.
Step 19
The letters look pretty good but we want to adjust the shadows and
highlights a little more. If you look at the “T” we want to darken the
side panels to go along with the gradiend we added before.
To do this, we want to go into Layer>Layer Styles>Color
Overlay. Change the color to black and drop down the opacity for this
one to around 20%. Add this to all the panels on the left side of the
“T”, as well as the bottom.
<="" a="">Step 20
With the “Y” we are going to use the Color Overlay again, but this
time we are going to change the color to white, and the blend mode to
Screen at 20% for the top two panels. For the panel in the middle of the
forks we want to change the opacity to 12% and change the Gradient
Overlay’s blend mode to Linear Burn.
Step 21
The “P” will have a black Color Overlay on the side panels like the “T” did.
Step 22
For the “E”, under the arms where we made a shadow, we are going to
add a white Color Overlay like we did with the panel in between the
forks in the “Y” and also changing the Blend Mode of the Gradient
Overlay to Linear Burn.
Step 23
Now that we have our text, shadows and highlights, we can start adding in the rest of our image.
Lets bring in a cloud image from Image*After for our background. Move the layer just above the background layer, and adjust it until it looks good to you.
Since the light of the clouds is coming from the left, we want to
flip the image so we have a consistent light source. Go to
Edit>Transform>Flip Horizontally.
<="" a="">Step 24
To give more emphasis on our light source I am going to add a white
to 0% opacity Linear Gradient (G). First create a new layer
(Ctrl+Shift+N) and move it above all the rest of the layers. Click and
drag a gradient on the top left corner and drop the opacity down to 50%.
Step 25
To make our colors a little bit more consistent, with the clouds and
sky we are going to give our image a blue hue since the text is in the
sky. Go to Layer>New Adjustment Layer>Gradient Map. Pick the white
to blue gradient and click on reverse.
Drop the Opacity down to 20%. Make sure this layer is the very top one.
Step 26
Next we want to add a texture to the letters to give them more of a warn look. So first grab this texture from Zen Textures and open it up in Photoshop. Bring the texture into our document and shrink it down to about 30%.
Now we want to select every part of every letter. To do that we are
going to Ctrl + Shift + Click on each layer in the letter folders. Now
that everything is selected, click on the texture layer and go to
Select>Inverse, then delete. This will get rid of the texture, except
the part on the letters.
Move the texture below the white gradient and Gradient Map layers (It
should be the third one down). Change the Blend Mode to Soft Light and
change the opacity to 40%.
Step 27
Since the “Y” and “E” are above the “T” and “P” they should be
casting a shadow. To make that shadow we are going to select all the
layers on the “Y” and “E” like we did in step 26.
Create a new layer and move it below all the “Y” and “P” letter
folders (So your order should be “Y” folder, “P” folder, shadow layer,
“T” folder and “E” folder). Fill the selection with black.
Make sure you deselect the letters (Ctrl+D) and go to Filter>Blur>Gaussian Blur. Change the Gaussian Blur to 12 px.
Now hold down shift and move one space down and one space to the left.
Step 28
Select all the layers in the “T” and “E” folders like we did in step
26, get the inverse selection (Select>Inverse) then delete. Drop the
opacity down to 50%.
Step 29
Finally what we are going to do is add some clouds in front of the letters. So go get the cloud brush
from Brusheezy. Create a new layer (Ctrl+Shift+N) and move it in above
the texture layer and below the white gradient layer. Add a cloud from
the brushes and drop the opacity to 80%.
Final
There we have our text, where the shadows are editable, good for adjusting the lightness and darkness of the text.
Here is an alternate version where I made more drastic shadows.

evergreen- الجنس :

عدد المساهمات : 1497
النقاط : 61908
التقييم : 34
تاريخ التسجيل : 2010-02-03 -

» Quick Tutorial: Adding Gradients to Text
» clouds photoshop brushes
» Text In Stitches
» Wet Window Text Effect Wet Window Text Effect
» 3D Layered Text Effect
» clouds photoshop brushes
» Text In Stitches
» Wet Window Text Effect Wet Window Text Effect
» 3D Layered Text Effect
Page 1 of 1
Permissions in this forum:
You cannot reply to topics in this forum